I will be jumping between the two-family project and my own personal bathroom project for the next few weeks as they are going on simultaneously. Yes, I know, Glutton for Punishment! It's just the way it happened to work out.
So, just to clarify, these are some of the materials planned for my bathroom remodel.
 This is the floor tile and was the first finish selected for the room. I debated between this one and

 I was fortunate to find a 4" x 16" solid tile that works beautifully with this tile. I plan to use it as a base tile rather than a wood baseboard..
I think that white streak is just a reflection. It's a little hard to see here, so check it out below.
 Now it's a matter of picking a grout color and the floor is settled.
I have ordered the shower and do have a small sample I can show you. There will only be seams in the corners and where the base meets the walls. I thought about tile but I really like the idea of no grout lines with this patterned floor tile.
 The shower choice is the white onyx material right in the center of the photo. The color is Icicle. There is a very teeny sparkle scattered randomly throughout and, although it looks solid white, it is equal amounts of a light gray blended with the white.
On a whim I dropped into Anatol's to check out fabric for curtains. And as is usually the case I found something I really like. (sample above) It's skimming the edge of being too much with the floor tile but I think it's going to work. I like a little tension vs playing it safe when it comes to fabric. They only had one yard in stock so that's on order. I'll show you the full pattern when it arrives.
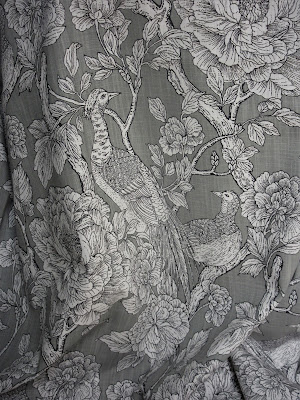 I was a little slow finishing this post and the fabric arrived in time to insert it here.
That allowed me to settle on a color for the walls. I debated on a contrasting color for the walls especially after the new Farrow and Ball color chart arrived in the mail.
 But, I talked myself into a more classic look and choose SW 7650 Ellie Gray with SW 6252 Ice Cube for the wood trim on the windows and the door. It's such a small bathroom that I want a seamless look.
Because I'm used to a pedestal sink, I don't want to crowd the room with a vanity. So I chose one from Ikea that measures 39 1/2" wide and 19" deep.
I'm looking forward to having counter space on either side of the sink...something I didn't have with the pedestal. I thought I could download a picture from their site but I didn't have much luck with that. Guess that will have to wait until it is installed.
The faucets and shower head are pretty simple too. This is one item that takes a chunk out of the budget no matter now simple.

On order for the sink.
 On order for the shower.
AND, just as I was about to publish this post, I was informed it will take at least one day's labor to demo the existing tile and backerboard. Seems it was installed as recommended and will be a bear to remove. Because the new tile is slightly less than a quarter inch thick, we can apply it over the existing tile. That could not have happened had I opted for the mustard and gray tile. Guess that's my silver lining.
So, just to clarify, these are some of the materials planned for my bathroom remodel.


THIS ONE!
Love the mustard/gray tile and it went well with my toile curtains, a fabric I LOVE, but this tile is a little over 1/2 inch thick and the cost was about three times the other tile. Those two things were enough to rule it out.
Love the mustard/gray tile and it went well with my toile curtains, a fabric I LOVE, but this tile is a little over 1/2 inch thick and the cost was about three times the other tile. Those two things were enough to rule it out.

I think that white streak is just a reflection. It's a little hard to see here, so check it out below.

I have ordered the shower and do have a small sample I can show you. There will only be seams in the corners and where the base meets the walls. I thought about tile but I really like the idea of no grout lines with this patterned floor tile.

On a whim I dropped into Anatol's to check out fabric for curtains. And as is usually the case I found something I really like. (sample above) It's skimming the edge of being too much with the floor tile but I think it's going to work. I like a little tension vs playing it safe when it comes to fabric. They only had one yard in stock so that's on order. I'll show you the full pattern when it arrives.

That allowed me to settle on a color for the walls. I debated on a contrasting color for the walls especially after the new Farrow and Ball color chart arrived in the mail.

Because I'm used to a pedestal sink, I don't want to crowd the room with a vanity. So I chose one from Ikea that measures 39 1/2" wide and 19" deep.
I'm looking forward to having counter space on either side of the sink...something I didn't have with the pedestal. I thought I could download a picture from their site but I didn't have much luck with that. Guess that will have to wait until it is installed.
The faucets and shower head are pretty simple too. This is one item that takes a chunk out of the budget no matter now simple.


AND, just as I was about to publish this post, I was informed it will take at least one day's labor to demo the existing tile and backerboard. Seems it was installed as recommended and will be a bear to remove. Because the new tile is slightly less than a quarter inch thick, we can apply it over the existing tile. That could not have happened had I opted for the mustard and gray tile. Guess that's my silver lining.
Comments
Post a Comment