The first couple weeks of solitary confinement went by quickly. I had puzzles to keep me occupied and I was enjoying the slower pace. But then...I started to think about things I could do around the house.
One big project that was on my "hire someone" list was the painting of my bedroom. Because it's a big room and there is lots and lots of wood trim that has never been painted, it was more than I wanted to take on. But as the days went by, it was obvious I would not be having a painter in my house anytime soon. At first I told myself I would just do the doors so I could see how I liked the color. Then when the pandemic is no longer a threat, I would hire a painter to do the walls and the windows.
Before I go any further, let me show you the room.
 North wall: Door on the left is the entrance to the bedroom from the hallway.
 East wall: Notice the two radiators under the windows. Behind the radiators there are wood panels from the sill to the floor. The purplish paint behind the bed is not a test sample. There was a bit of a flashing problem on the chimney and that wall had to be repaired. Since I didn't have any matching left over paint, I just painted it a color I had. I knew I was going to change the color of the whole room so it really didn't matter.
 South wall: The room juts out once it gets past the bay window. The first door is to a small closet that was added years ago. Originally those two doors were side by side and the closet was only about 18-20" deep. The inside of the closet protrudes into the bathroom and still does. It's deeper now and the AC drops from the third floor down through this closet to the kitchen.
 West wall: With the door open you can see into the newly remodeled bathroom.
 And here is a shot with the bathroom door closed.
 Here you see the rest of the west wall including the doorway into the hall.
Obviously I was not exaggerating about the amount of wood trim. (three doors, jams and casing: three windows with panels beneath them: eight inch baseboards and a picture mold around the room next to the ceiling.) Daunting for someone about to turn 75, but I told myself that whenever I decided I had had enough, I would just leave the rest for the painter.
 I didn't take pictures when I first started sanding the closet door. This is actually the window next to the closet, but it is what has to happen to all the wood trim. This is followed by a good wet wipe down and a prime coat.
 I caulked after the primer and once again after the first coat of paint.
 And in some cases, again after the second coat which required some touch up painting. It is impossible to see all the places that need it on the first try. Plus, I get anxious to move on to the next step and hope the paint will seal some of the gaps.
Several days have elapsed with me working three to four hours a day, which is about the max I can handle and still be able to go at it again the next day.
 The window next to the closet with a coat of primer.
 And then two coats of paint. In between these two steps...
 ...there was patching, and...
 ... plenty of caulking. Although caulking is well worth the effort, sometimes the effort seems a bit ridiculous. Try getting a caulk gun lined up properly between the radiator and the wood panel and you will agree.
 As you can see I'm doing the baseboards as I move along.
 I'm also doing the picture rail next to the ceiling in stages. It's easier for me to do it this way than to keep moving the furniture. Notice how different the paint looks on the two walls in the corner. How the light hits this particular paint makes a big difference in this room. I'm hoping I can get some true color photos when the room is finished. It really is a calming green. It is Illusive Green by SW #7059, although, not exactly. When I had the paint mixed I got the satin for the woodwork and then went back for the wall paint later. I started painting the walls and realized there was quite a color discrepancy between the two.
 When I took the two gallons of wall paint back to have them adjusted to match the wall paint, I realized the trim paint was not really a perfect match to SW 7059 either. But too late on that score as a great deal of the woodwork had already been painted. The only thing to do was to match the wall paint to the trim paint.
Normally I would not have ever had this problem. But because of social distancing I was calling the order in and picking it up at the door. Therefore they did not do a color match in front of me and, my bad, I didn't do one when I got it home. However, I'm fine with the color, but I don't have the formula for it either.
 This section is a bit tough for someone of my height to reach, but I'm pushing myself to figure out a way. Of course, I won't be able to tape off the ceiling so whatever I do will require a steady hand.
 I taped my paintbrush to a hammer to do the cutting in next to the picture mold. However, the molding is a satin sheen and because I am going to have to be extremely careful not to get it on the ceiling, I am going to give it a try with a smaller brush. It will all depend on how steady I can hold an outstretched arm standing sideways on a stepladder. Add to that the fact that, although I still have decent distance vision for my age, it's not 20/20.
I'm inserting some pictures here to show that I have have now painted the molding at the top of the wall over the closet. (sorry for the blur)

 I used a smaller brush with a long handle but I still needed a longer reach, so I taped it to a screwdriver.
 Under the two windows in the bay are radiators with wooden tops on hinges. I padded and covered them with fabric a couple times over the years, but I would like something different going forward.

They look good without anything covering them but they did come in handy as I basically used them as nightstands.
 It is impossible to get a ladder up close enough to be useful on the bay windows because of the radiators, so I have been using the scaffold. However, to reach the ceiling I have to position the walk boards on the top rung. (up one level from what you see in this picture) Needless to say, I don't feel real secure working at that level.
 To make it even trickier, the marble slab under the radiator is slightly wider than the legs of the scaffold so one wheel is on the marble and the other on a book while....
...the other two legs are resting on the floor.

 Painting the wood panel behind the radiator requires one to be a bit of a contortionist. There is a bit of room to reach in behind the radiator from the right side.
 But the opening is almost non existent from the left . Obviously, it can't be seen so the paint job doesn't have to be perfect but it still needs to be done.
 You can see here I removed the recessed sash lifts before I painted.
 It has probably been 118 years since this has wood has seen the light of day.
 The lift hardware will need a good vinegar soak to clean it before and gets painted and screwed in place on the sash.

 I did get an assist from brother, Dan, to push the huge pink piece of furniture away from the wall so I could get to this section of baseboard.


One big project that was on my "hire someone" list was the painting of my bedroom. Because it's a big room and there is lots and lots of wood trim that has never been painted, it was more than I wanted to take on. But as the days went by, it was obvious I would not be having a painter in my house anytime soon. At first I told myself I would just do the doors so I could see how I liked the color. Then when the pandemic is no longer a threat, I would hire a painter to do the walls and the windows.
Before I go any further, let me show you the room.


Obviously I was not exaggerating about the amount of wood trim. (three doors, jams and casing: three windows with panels beneath them: eight inch baseboards and a picture mold around the room next to the ceiling.) Daunting for someone about to turn 75, but I told myself that whenever I decided I had had enough, I would just leave the rest for the painter.


Several days have elapsed with me working three to four hours a day, which is about the max I can handle and still be able to go at it again the next day.


Normally I would not have ever had this problem. But because of social distancing I was calling the order in and picking it up at the door. Therefore they did not do a color match in front of me and, my bad, I didn't do one when I got it home. However, I'm fine with the color, but I don't have the formula for it either.


I'm inserting some pictures here to show that I have have now painted the molding at the top of the wall over the closet. (sorry for the blur)


They look good without anything covering them but they did come in handy as I basically used them as nightstands.


One more window, one more radiator and about 14 feet of baseboard to go. (Not sure if the pink cast was created by the overhead light or something else.)


That final window has now been sanded, cleaned and primed. I think I see the light at the end of the tunnel but still so much more to do.

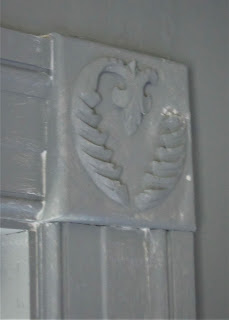
Every room in this house has the same pattern on the corner blocks. Unfortunately someone before me chopped into all six of these in this room to mount curtains. Maybe when all the big stuff is finished I'll take some time to create a mold and repair the damage.
Finally, the walls are painted. I wasn't sure I would make it this far.

I'm still working on the furniture arrangement. I moved the pink piece from the west wall to the east wall (by using my back and pushing with my legs) and am living with that for a few days to see how I like it. It probably won't stay pink but I'm waiting to see how things go with some of the other elements. There is still much to do. The chandelier needs to come down so I can paint it. All the hardware needs to be painted.

I started with the window hardware. Not easy to see in this picture, but the hardware is now platinum.

There is much more contrast between the sash color and the hardware but I'll have to take a shot away from the brightness of the window to show that.
I was recently notified that blogger is changing their format. I don't want to deal with that EVER, but certainly not in the middle of a post. So, I'm going to conclude this post and start a new one for the before/after shots.
Right now I'm working on the hinges by taking off a set at a time, cleaning it, painting and reinstalling it.

This is #1 of seven. Sounds odd (no pun intended) but one door has three sets and the other two doors just have a set at the top and one at the bottom. Not sure how I'm going to manage those two doors when there is only one hinge holding them in place.

This is where the bed has landed for now. If it stays here, I will have to find a headboard to balance things off and cover that outlet over the bed.

The loveseat is really comfortable and I'm hoping I can figure a way to keep it in this room. Lots of "ifs" right now. Hope to have it all figured out for the next post.
So much work!
ReplyDelete