Once I painted the table and chairs on the sun porch, I started seeing the rest of the porch as a little shabby. I was giving some thought to painting the floor and enlisted my brother's opinion. We discussed options for the floor and I was ready to start the prep. On his way out the door he casually said, "What about painting the brick?" He no more than pulled away from the curb and I had my brush dipped into the primer.
Sounds rash but let me give you a little history.
 This shows the back of my house in 1982.
 Take note of the size of the porch.
 Now focus on the outline left on the brick by the sloppiness of the previous painter and the darker bricks that had been covered. There were also wooden anchors driven into the brick so, all in all, it was a bit messy.
 The porch that replaced it is considerably larger. Now that unsightly wall is inside this porch. I made many attempts to remove those awful marks on the brick wall. Some things helped a little but...
 as you can see from this picture taken a few days ago, nothing worked well enough. I felt there was nothing to do but turn a blind eye to it and I DID! Every once in awhile I would notice it, but mostly I acted like it wasn't there. That is until my brother suggested painting the wall. I cannot believe I waited so long before considering paint! Admittedly, painting brick is not the first course of action I would take. But in this case, well, it really seemed justified. I guess I'm better at blocking what I don't want to see than I thought I was.
 I normally avoided taking pictures of this side of the porch so there were none in the archives. I took this one before I dove into this current project. The window on the right is over the sink. That box under the window is head room for the exterior stairs to the basement. (Everyone asks if it is a hot tub, so I figured I better get that cleared up right off.)
 Here is the left side with the little pantry window now enclosed in the larger porch. (The serving cart is just waiting for a permanent place inside the house. I had plans for it in the foyer and that went out the window when the plans took a different direction.)
 I jumped right in with the Gripper primer but had to work around a few places where the mortar was flaking and where I had pulled out the wood fragments that had been anchors for the original porch.


Sounds rash but let me give you a little history.


Turns out that much of what was not protected by the smaller porch needed tuck pointing. So, I skipped over those areas and alerted my brother I would need some help.

I knew he was pretty busy with four jobs going at once. I thought if I raked the joints it would speed things up a little. That was going quite well just using a paint can opener.

The vertical joints had me a little nervous because the mortar was flowing out like dry sand. I thought I might have a 911 on my hands at any time. I was relieved when my brother showed up to give me some moral support and... hand me to tools needed for repointing???
My whole family knows my patience threshold when I am on a project, so he was confident I would give it a try. They say you are never too old to learn something new and this might be the perfect opportunity to practice. After all, it is going to be painted, so how bad could it look?

Once you get the basics, this is all about practice. The straight away wasn't too bad.

However, this section with no room to maneuver my arm and no place to put my elbow, had me cussing more than a little. I was thinking of all the leftys I knew and wondering if they would take over.

The vertical joints were also difficult for me. I'm on the ladder, my head is touching the ceiling and I can't hold my hawk up where it needs to be and still see what I'm doing. I gave up on the tools, and the technique, and squished the mortar into the joints with my fingers. A far from professional job, but remember, it is going to be painted.

Plus, the areas up this high can't be inspected from the floor!

Another area that gave me trouble were the corners. I put the mortar in the front joint and pushed it back out when I did the side joint. Obviously there are some tricks to this that were not covered in my quickie tutorial.

Finally, one coat of paint on the entire wall. With all the pits and pores in the brick, this took coaxing to actually cover with no brick color peeking through.

Finally, three coats brushed on everything. Now for the trim around the door and windows. I already have one coat around the door in this shot.

I used Northern Cliffs 1536 on the bricks and Gateway Gray HC-105 on the trim. Both are Benjamin Moore colors.
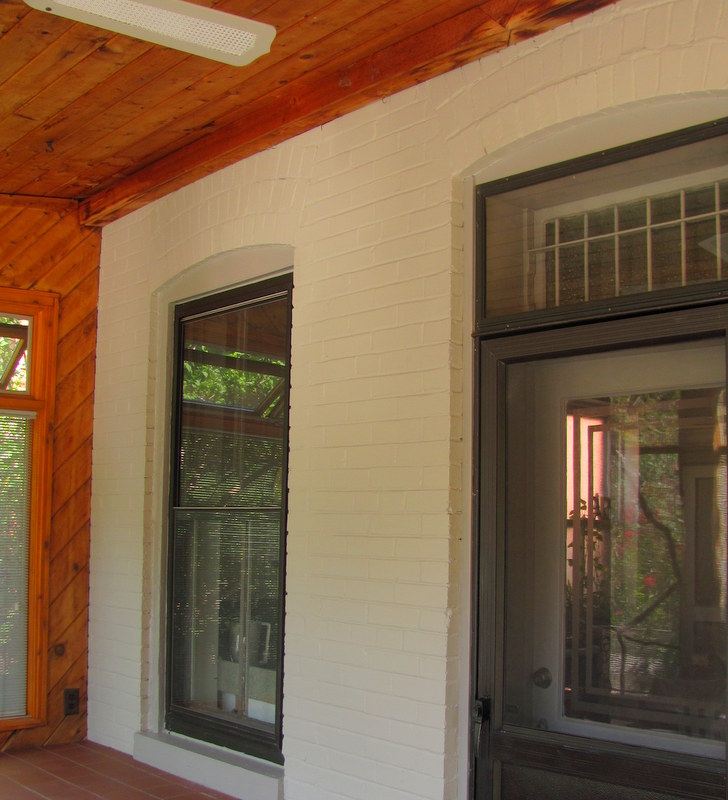
It does lighten up the porch and even bounces a bit more light into the kitchen. Did you spot the fan blade at the top of the picture?

This is before it got in the way of my paint brush.

This is after.
So now I'm back to where this whole thing started....the floor.

The wood border in front of the door needed to be replaced and there was also one cracked tile in this area. A few extra tiles had to come out in the process.

There were also a few loose tiles on the elevated section that needed to be reattached.

That work is "in progress" right now. But what am I going to do with this floor? That is the question that triggered this whole thing with the brick wall. I really am tired of the terra cotta color but the best option is also the most expensive. I have discussed painting the tiles or going over them with another material like cork or carpet squares. Right now the jury is still out. I am open for suggestions. I could clean these tiles which would be an improvement, but without the natural brick color, this floor no longer relates to anything on the porch. Would love to hear from you if you have painted floor tile successfully. It does get everyday traffic so whatever I do needs to hold up to the wear.
Impressive! What an improvement! A lot of work for you but so well done and striking! Carpet squares might lend a cozy and warm look in cold months.
ReplyDeleteLove it Trish!! It's a thing of joy and beauty to behold! :) x Maria
ReplyDeleteWow that brighten up the whole area! Great job. Di@Cottage-Wishes
ReplyDelete