Easter eggs and ways to color them are all over the DIY blogs right now and I got caught up in it too. I read about using neckties to dye eggs and decided that might be pretty cool.
First you have to find 100% silk ties. I tried the resale shops, Goodwill, garage sales and a church rummage sale. I paid from $2 each to 3 for $1. The church rummage sale was the last place and the best price. It also happened to have the best variety.
 There will usually be a tag on the small end of the tie giving the fabric content. There are other things to keep in mind when selecting the ties. Remember that most pastels will not be a good choice. Sometimes one color will transfer and another color from the same tie will not. I'm just letting you know there are a few variables and you won't always be able to tell which ties work until you actually try them.
For example:


This one worked out pretty well.

 You can see them a little better here but not a showy egg. The pink did not transfer at all.

 On this one the red came through with more intensity than the green.


I thought this one might be a lovely pattern on the egg but again the dye was too pale.

 You wrap the eggs with the right side of the material against the egg shell. I used twist ties to hold the fabric in place. You need to get the fabric flat against the egg shell as best you can. Folding it is fine even though the pattern might smudge some.
 Then you wrap the eggs again in a plain fabric like an old pillow case. Put the eggs in a non aluminum pan and cover with water. Add 1/4 cup of vinegar and bring to a boil. Simmer for 20-25 minutes. Use tongs to move eggs to a colander to cool. Unwrap and prepare to be surprised and sometimes a little disappointed.


First you have to find 100% silk ties. I tried the resale shops, Goodwill, garage sales and a church rummage sale. I paid from $2 each to 3 for $1. The church rummage sale was the last place and the best price. It also happened to have the best variety.

For example:


This one worked out pretty well.

This one...not so well. The little diamonds faintly transferred to the egg shell but they were difficult to pick up with my camera. Definately not a winner.


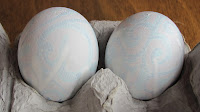
This one was a little more successful. Pretty but subtle.


It is more vibrant than the others but not quite what I was expecting when I unwrapped it.


I thought this one might be a lovely pattern on the egg but again the dye was too pale.

These were in my first batch and turned out nicely. I was encouraged by that and kept trying. In all I dyed a dozen eggs and I think I used 9 different ties. It is great fun when it works and is a fairly easy process.


This was the tie that produced the best result.

So you can see why I thought this might be a good one too. It was a total bust. I thought maybe it really was not 100% silk but who knows for sure. It just didn't work out.
I saw this technique on the Today Show with Hoda this morning. They did not show how it was done...just the finished product. So now you know the real story. I would like to try it again after I have collected a supply of ties that I think have the best chance of producing good results. Maybe next Easter.
Comments
Post a Comment