I was going through "my favorites" the other night and checked in on Robin Storey's blog where I discovered a contest that challenges the entrants to create a holiday decoration that includes a found object. I leaned back in my chair and mentally went through my found objects stash.
The thing that stood out was...
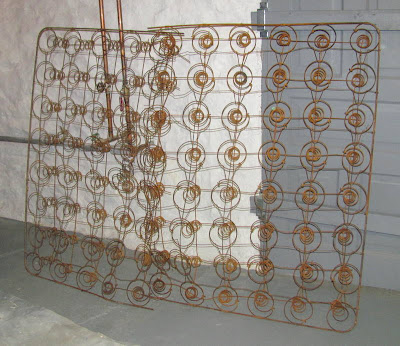 this set of rusty bedsprings I found two years ago and had not yet used. An idea started to gell as I got ready for bed. The next morning I jumped (that might be a slight exaggeration as I always test my ankles to make sure they are holding before I stand up.) out of bed. Anyway, I proceeded directly to the basement to make sure I had enough to complete the idea I had in mind.
The next thing was to email my brother, Dan, to enlist his help brainstorming a way to make this idea a reality. Dan is great at this. He thinks outside the box but he also can forsee any potential engineering hangups. So the first order of business was a prototype to help us think through the steps of bringing this idea from behind the eyes to before the eyes.

 The next step was to gather the materials. Both Dan and I are alley shoppers and have a collection of found objects we store for just such an occasion. In his garage we found the perfect weathered pole. Even he could not remember where he picked it up.
Then came lots of decisions about how tall, and how to attach the springs.
 Dan experimented with the best angle for the dowel rods that would become the support branches.
 We used paint brushes to similate the branches so we could get a visual and perfect the placement of the drilled holes.
 The pole was nicely weathered but the dowel rods were not. A little watered down brown and gray paint was sufficient to make them blend in with the pole.
This post might sound like it all went together babing! babang! But let me stress that there was some trial and error and plenty of hard work. Once all the branches were painted, I realized I would have to take them all out again to line the pole with bed springs. By this time Dan was gone and I struggled (no exaggeration) first getting them out and then getting them back in again. It is important to have a tight fit so they won't sag when loaded down with springs and decorations.

Then came the stringing of the lights but as we all have experienced, first comes the untangling of the lights. (moan) I wound the lights around the branches and then added the springs. Sadly, I was a little short on springs so I had to remove the bottom two branches. I put the word out for more springs so if they should surface, I will just add the branches back to the tree.
Now, what would be the best choice for ornaments? I tried a few regular tree ornaments but that was a negative. I wanted to use chandelier crystals but they seemed so lost by themselves. I rummaged through my stuff until I found some old watches I had been collecting. With some pages torn from an old book I fabricated ornaments using the watch faces as the focal point of each one.


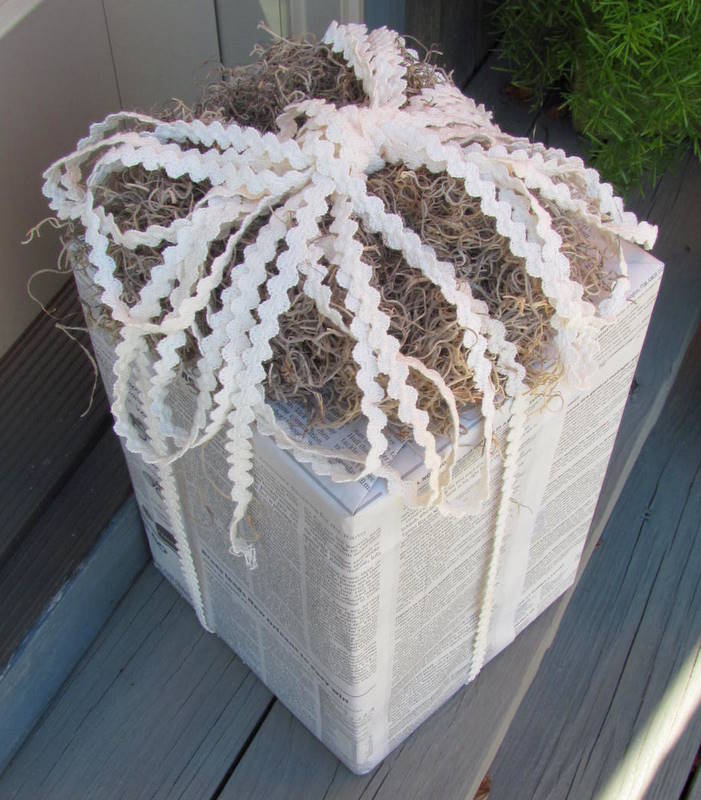
More newspaper, spanish moss, and some rick rack ribbon.


The thing that stood out was...

The next thing was to email my brother, Dan, to enlist his help brainstorming a way to make this idea a reality. Dan is great at this. He thinks outside the box but he also can forsee any potential engineering hangups. So the first order of business was a prototype to help us think through the steps of bringing this idea from behind the eyes to before the eyes.

Ok, secret's out of the bag. Yes, it will be a Christmas tree. Like I said, this was the stage of working out the bugs.

Then came lots of decisions about how tall, and how to attach the springs.


This post might sound like it all went together babing! babang! But let me stress that there was some trial and error and plenty of hard work. Once all the branches were painted, I realized I would have to take them all out again to line the pole with bed springs. By this time Dan was gone and I struggled (no exaggeration) first getting them out and then getting them back in again. It is important to have a tight fit so they won't sag when loaded down with springs and decorations.

We used an old tree stand and Dan stabilized it by screwing it to a sheet of plywood.
A video of me trying to get the bedsprings apart might have been quite entertaining here but you'll have to use your imagination. NOTE: A tetanus shot before trying this on your own might be wise.
Then came the stringing of the lights but as we all have experienced, first comes the untangling of the lights. (moan) I wound the lights around the branches and then added the springs. Sadly, I was a little short on springs so I had to remove the bottom two branches. I put the word out for more springs so if they should surface, I will just add the branches back to the tree.
Now, what would be the best choice for ornaments? I tried a few regular tree ornaments but that was a negative. I wanted to use chandelier crystals but they seemed so lost by themselves. I rummaged through my stuff until I found some old watches I had been collecting. With some pages torn from an old book I fabricated ornaments using the watch faces as the focal point of each one.

 |
I also cut numbers (1-12 to tie in with the watch faces) from a notecard sandwiched between two pages of the old book.


I also made some paper rosettes and attached them to the tips of some of the branches.

A small crystal in the center of these helped them catch the light.
Some time ago I found two boxes of metal luminary bags at the St. Vincent De Paul thrift store.

The color was great with the rusty bed springs so I decided to use this for the tree topper.
The biggest challenge of this whole project was getting a photograph that does it justice. I jumped through a lot of hoops in the attempt, but my photographic equipment and skills are in need of an upgrade.

Dan did everything but dangle from the chandelier to hold the lights in the optimum position.

Since the springs were the basis for this project, I wanted them to show in the photo. Making one thing look good was at the expense of something else. We finally settled for what you see here.
I see why the serious bloggers hire a photogrpher.

It's not that I'm not serious, just not wealthy and serious.
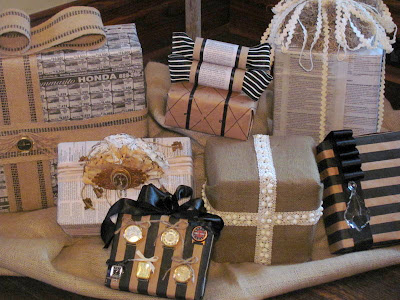
There still seemed to be somthing missing. Ah presents under the tree.
In keeping with the theme, I thought mostly found objects would be key.

Newspaper, burlap webbing, a watch face and a little twine.

A dsw shopping bag, some satin ribbon and a pretty crystal.

Shopping bag, watch faces, twine, and black satin ribbon.

Newspaper, twine, coffee filters, clips from the bed springs, and a piece of jewelry. (the coffee filters and jewelry were reclycled from last year's wreath)

Shopping bag from Panera Bread Co., narrow black ribbon, wide striped ribbon, toliet paper rolls and a little newspaper.

Burlap and some beaded trim.

I'm hoping my present is the $250 prize for winning the contest. But in order to do that I need votes. On Dec. 21st all entries will be open for voting so stay tuned for instructions on where and how to vote.
I am linking to: Coastal Charm
Your creativity continues to wow me. I'm not sure why I didn't get this creative gene.
ReplyDeleteWOW WOW WOW!!! I'm so excited to know that you are going to enter your fabulous Christmas inspirations on our blog, Robyn Story Designs!! I stumbled upon your post and was super thrilled to know that you're 'campaigning' for votes!! That's the way to do it! LOVE YOUR INITIATIVE!!! GOOD LUCK
ReplyDeleteAnother amazing project. This one is definitly a winner.
ReplyDeleteGreat idea for a tree. I almost took an old spring home but the springs look like they would be a monster to cut apart. Have any tips?
ReplyDeleteI love your tree, I'm surprised you had those springs for so long with all the great ideas out there! I wish I could find one of those!
ReplyDeleteNice job!
Susan @ homeroad.net
Very cute tree!
ReplyDeleteI have SO many bedsprings!!! I'm like the resident old-bed-collector!!!
It's gross taking them apart, but once you're all "geared" up in gloves, dust mask and a Tyvek suit, just GO FOR IT!!!
Very creative use of these little spring...
visiting from Funky Junk...
I LOVE IT!
ReplyDeleteWhat a creative and clever girl you are! Wow! This turned out so cute!
ReplyDeletexoxo laurie
Well this is most fascinating!! You really went all out on this tree -- very creative and I LOVE all of your wrapping idea!
ReplyDeleteSuch fun and creativity! You are a truly inspired junquer! ~Sue
ReplyDeleteWhat a creative use of an old bed spring! I would never have thought of that....I absolutely LOVE it!!! (you've got my vote!) This tree would look wonderful in the courtyard/entrance to Robyn's store.
ReplyDeleteNow that you've tweaked my creativity, I am on the lookout for my own set of springs...thinking of next year's tree...to go along with last year's Christmas tree/bottle tree.
Thanks for sharing...
Jane (Artfully Graced)
That is an amazing recreation of old bed springs! Your attention to detail in the ornaments and gifts under the tree was superb! I like the addition of moss on top of your gift.
ReplyDeleteWhat a sparkling Christmas tree! You are so attentive to detail and eye catching detail. Awesome creation!
ReplyDeleteoops. I meant eye catching design.
ReplyDeleteLove your tree it is awesome!!!! Your ornaments and all your pretty wrapping look just beautiful!
ReplyDeleteLove the tree! While wondering through some of the blogs I follow, and checked out some that link with them, I saw that someone had posted candlesticks made out of old bed springs(maybe you???), but I have never seen a tree made with them or much else for that matter. It really makes me wish I hadn't pitched our old ones. =(
ReplyDeleteGood luck! and what are ya doing with it afterwards??? ;)
Incredible project. Beautiful.
ReplyDeleteWow! Hopped over after seeing your win on the Robyn Story Designs blog - congrats! I love the watch faces and numbers with the rusty springs - seem to make a statement together about the passing of time. Hope you leave it up through New Year's Day as it is a perfect "tree" for that.
ReplyDeleteAmazing. You are very creative indeed! I love the contrast of the metal with the soft elegance of the ornaments. Great job! I browsed around a little on your blog too! I am now your newest follower!
ReplyDeleteCongrats on winning...I voted for you and so glad you won!! I am a new follower and hope you will visit me at Cottage-wishes!
ReplyDeleteGreat project, love how it came out and have fun with you present!
Congrats on winning w/ Robyn Story Designs!!
ReplyDeleteWow, you are one creative chic!! LOVE the tree!!
I'm a happy follower now! :o)