WARNING: This is not a short post...more like a chapter in a book. It's about a tall, slender older lady who reinvents herself with a major makeover. I call it, FIVE SHADES OF GREY. Not as riveting as 50 Shades Of Grey, from what I've heard, but hopefully captivating enough to keep you reading to the end.
With that said, let me set the scene.
What used to be my pantry with one wall of floor to ceiling cabinetry is now a walk through to my new half bath. So instead of two doors and a window in a 4 1/2' x 6' room I have three doors and a window and a 32" wide floor to ceiling cabinet. (I should say, will have, shortly. Another post coming on that.)
 That left a scant 27" wide wall space for a piece of furniture. I thought this should be a secretary. I never went anywhere without my tape measure and I think I measured at least 30 possible candidates before finding one that would fit.
 I spotted this one through an open door to the backroom in a small resale shop. It was not on the floor for sale but rather in the private quarters being used to store items. I inquired about it and, as is often the case, on the right day, everything is for sale.
 Of course I measured and theoretically it should have worked. I just didn't take into consideration the "out-of-square" corners in my house and slight undulations in the floors. So, some adjustments had to be made to squeeze this piece into that particular space.
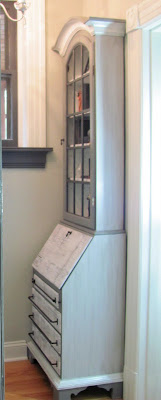
 I also assumed the oversized header on the piece would clear the door casing but I was wrong about that. Didn't it look really tall to you when it was in the shop?
 As a compromise, we stopped the baseboard in front of the secretary. Then shaved a little off the lower trim on the left side and added a little elevation to the feet on the right side.
 That was effort I was not counting on and I still had to paint the piece. Oh but that was just the beginning!

 In the meantime, I just kept moving forward. I took off hardware and hinges and shelf brackets. I removed the glass and scrubbed down the entire piece.
 I stripped one of the drawers thinking that might be a route to go but nixed that idea rather quickly. The work involved for any benefit received was a little unbalanced.
 Instead I went for the primer and took it all to a clean slate of white.
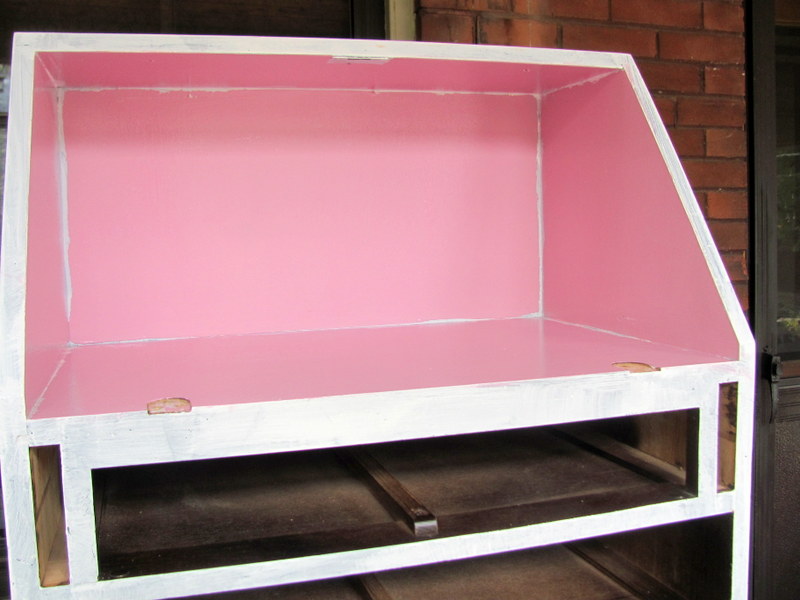
 Then I started to paint with this shocking pink. So are you SHOCKED? Well, not to worry. This lovely Cranberry Ice is only going behind the closed door of the secretary. It's like fancy underwear....only I will know it's there, and I like having that little risque secret. Ok, not really that much of a secret if I post it here, but you get the idea.
 I was proceeding as if I knew exactly what I had in mind for this piece when I didn't have a clue. I had hopes that the piece would speak to me along the road.

 I was also working on the drawers at this point. A friend had access to the architectural plans for a Kansas City court house from 1937. He graciously allowed me to copy them.
 I chose the page that had details of the lighting in the building.
 I arranged several of the lighting fixtures on the drop down desk front.
 I centered the largest fixture onto the drawers. It was the perfect size to cover all four drawers. Surely now the piece would be telling me what to do next. Nothing??? If it was speaking to me it was in a foreign language because I was not getting it.
 So, I proceeded with the obvious. The color of the piece needed to work in the pantry with the white/black/and greenish gray on the walls and trim. So, I chose a couple grays and started painting. Maybe clean and simple was the best choice. Lord knows there is plenty of drama just a few feet away in the dining room.


 I think these are pretty cool. Would love to find more architectural plans. If someone knows of a source, I would be delighted to hear from you.

I continued to work and rework the piece. I glazed the white to tone it down and then waxed the entire piece with a mix of wax and rottenstone. After buffing everything I moved on to the hardware.
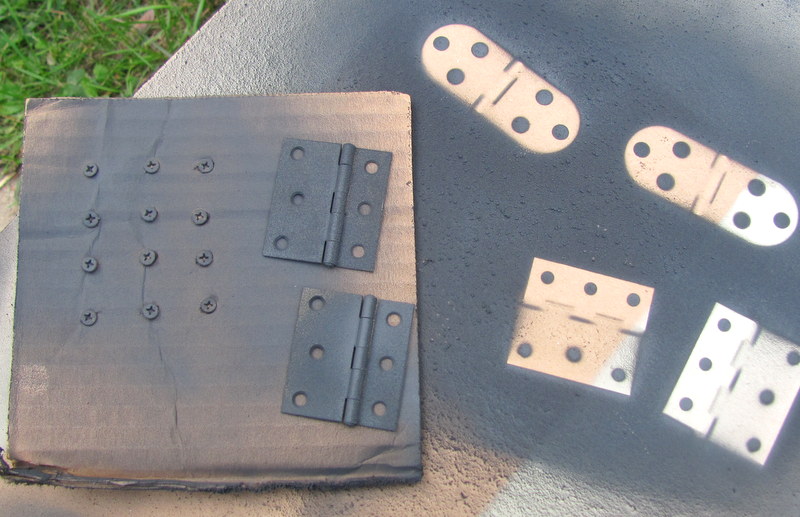
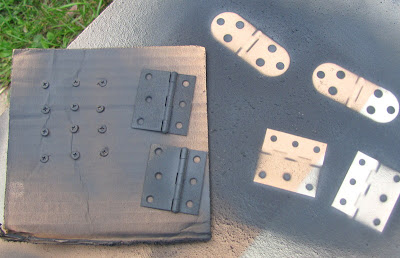 The hinges for the drop down desk needed to be one color and the door hinges another. But first I used a wire wheel to break through the tough finish on them. Then primer, sanding and several coats of paint completed that job.
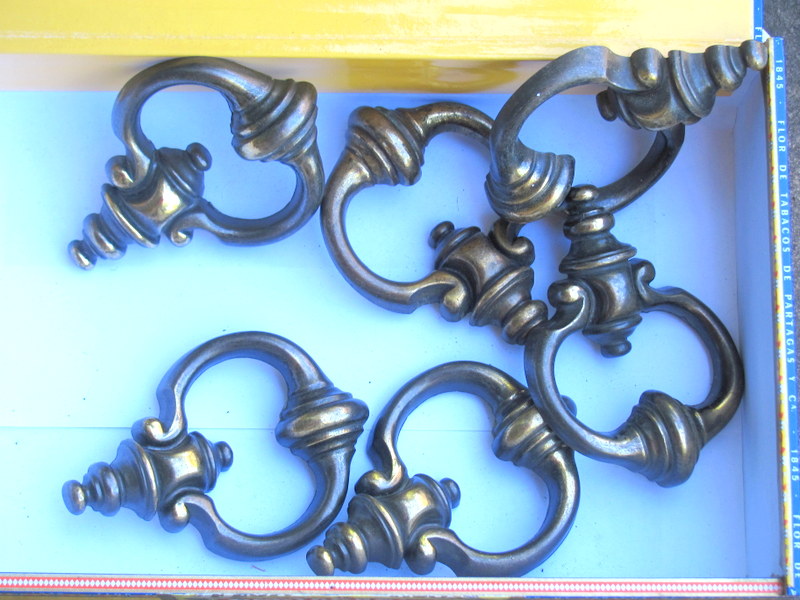
And then there are the drawer pulls. Those thrift store pulls got beat out by an idea my brother came up with. He suggested using old fashioned curtain rods and I loved the idea. The rods were not a problem but I had to find the end pieces.
 Lucky for me another brother saves lots and lots of things that come out of old houses and there was a good chance he had these too. Bingo!
 Now, just clean and paint to make them uniform. I soaked them in vinegar, steel wooled off the grime and crud, and enlisted Dan to affix them to the drawers. (the vinegar soak is a real time saver) Now just a knob for the drawer and a pull for the desk and the hardware is a wrap.
 I went through my salvaged hardware again and came up with these. I think they will work fine for the door and the desktop... simple but stylish. I shouldn't be too flippant here. The drop down desk originally opened with a key that was broken off in the lock. To use this pull instead required removing the lock, cutting a wood block to fill the void, holding it in place with glue, and drilling a new hole for this pull. Reinventing furniture is not for those who are easily discouraged.

Now the rods needed to be cut to size and I needed...you guessed it, my brother, Dan, to handle that chore.

He cut the rods

and attached the hardware to perfection.

About that secret. There is a little more to the story. A secret needs to be good or why bother, right? I thought so too, and mine seemed a little lame.
 So I decoupaged all but the cubby holes themselves with gift wrap paper..... (that I bought at a garage sale early this Spring. And since I bought a few rolls, I used it inside the drawers too.)
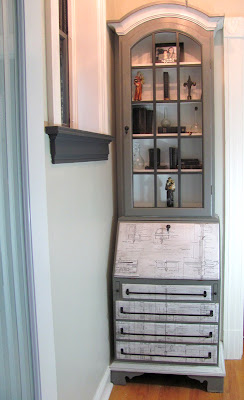
And FINALLY I can say it is (almost) finished.
 This is the view from the dining room doorway.

 So there you have it. Another project crossed off the list.
 I can now fill those drawers with some of things that used to occupy the drawers of the butler's pantry cabinets.
 Thanks for hanging in until the end of this post.
I am linking to : Savvy Southern Style
Fine Craft Guild
Shabby Creek Cottage
Redoux Interiors
Miss Mustard Seed
Liz Marie Blog
With that said, let me set the scene.
What used to be my pantry with one wall of floor to ceiling cabinetry is now a walk through to my new half bath. So instead of two doors and a window in a 4 1/2' x 6' room I have three doors and a window and a 32" wide floor to ceiling cabinet. (I should say, will have, shortly. Another post coming on that.)


(savvycityfarmer.com)
My idea was to copy this look from a photo on Pinterest.
I put forth a great deal of effort in an attempt to uncover the process used to create this look. I checked with two artists friends for their input. I contacted the artist who did the piece and another blogger I thought might be able to help. No tips or helpful hints, so, I then experimented on some pieces I had on hand. But nothing was giving me the guidance I needed.


(etsy.com)
I pinned this to my furniture board on Pinterest thinking I might try it someday. That day is today.


It was then that the piece spoke. What I heard was, "This is not working!" And it wasn't. The gray on the left was not right.(Winter Gates AC-30) So back to the paint store for the gray on the right.(Amherst Gray HC-167) I continued to repaint other parts too. Some of what I painted white, I then painted gray. Some things I thought should be black looked really bad black and they ended up white.

I decided to keep the sides radomly stried in the original two gray colors I had selected.(Embers AC-28 and Winter Gates AC-30) So now I had six different colors on this piece. And I still had the hardware to consider.

I wasn't going to keep the bat wing pulls no matter what color they could be. I kept an eye out for something different.

I saw this piece at Vincent de Paul thrift store. It had 8 pulls that might work but it was marked $100. As soon as I left the store, I realized I should have asked if they would sell the hardware only. After all, it was missing two pulls for this chest anyway.
The next day I went back and asked the manager about selling the hardward only. His response was, "No one will buy this without pulls." So, I said, "If I replace these with something different would you consider it?" He said, yes, ....if I replaced the 8 pieces with 10. So back home I went, thinking... I don't have 10 matching pieces of anything.
I was wrong. I had 16 of these. I don't remember where they came from and I was not that interested in keeping them. I grabbed a screw driver and headed back to the thrift store hoping they would not overpower the piece. Turns out that was the least of my worries. The screws were so short they only made about two turns and some would not work at all. I stayed at it until I had seven of them attached. Then I summoned the manager to tell him I could not get the one drawer without pulls to open and that one of my screws was a little short. He took over from there and I left with my pulls. (even exchange)

I'm not sure who got the better deal. I didn't notice until I was removing these that one is different from the other seven. I was in such a hurry to get away before the manager changed his mind that I didn't get a picture of that piece with the new hardware. I bet it sold already. It looked pretty snappy with the new pulls.

So, onto the drawers. I glazed them with a charcoal tinted glaze and put a protective seal over the fronts.

I did the same with the drop down desk front. Here are some closeups of the light fixtures shown here.


Just to keep you up to date, I decided the Cranberry Ice was too tame for this madam so I switched to Razzel Dazzel. Who wouldn't want to double coat this cubby hole cabinet, AGAIN?
I continued to work and rework the piece. I glazed the white to tone it down and then waxed the entire piece with a mix of wax and rottenstone. After buffing everything I moved on to the hardware.
And then there are the drawer pulls. Those thrift store pulls got beat out by an idea my brother came up with. He suggested using old fashioned curtain rods and I loved the idea. The rods were not a problem but I had to find the end pieces.


Now the rods needed to be cut to size and I needed...you guessed it, my brother, Dan, to handle that chore.

He cut the rods

and attached the hardware to perfection.

About that secret. There is a little more to the story. A secret needs to be good or why bother, right? I thought so too, and mine seemed a little lame.

And FINALLY I can say it is (almost) finished.


This is the view from the bathroom doorway. Remember this is like a pass through room...only 4 1/2 feet wide so the only way to get a picture is by standing in an adjoining room.
Remember, I said almost finished?

I was referring to the fact that there is no glass in the upper cabinet because we had a little mishap when reinstalling it. Not to worry. It was a type of bubble glass that I was not particularly fond of anyway. So I will replace it with clear glass.


I am linking to : Savvy Southern Style
Fine Craft Guild
Shabby Creek Cottage
Redoux Interiors
Miss Mustard Seed
Liz Marie Blog
Loved reading about this whole process! What a transformation!! Your secretary is amazingly unique! I am in awe of your ideas; the dazzling pink/cranberry is perfecto!
ReplyDeleteI love what you did to the secretary. I have a link party on Wednesdays, and I would love it if you would link this and any other posts. It is called Wednesdays Adorned From Above Link Party. It runs from Wednesday to Sundays.
ReplyDeletehttp://www.adornedfromabove.com/2012/09/how-to-make-natural-tinted-lip-balm-and.html
I hope to see you there. I am your newest follower, and I would love for your to follow me also. Have a great Day.
Debi Bolocofsky
Adorned From Above
www.adornedfromabove.com
Another wondeful transformation! Love the hot pink inside.
ReplyDeleteThis is amazing! WOW, I love the blueprint you put on the outside....it looks so good. I love how it looks feminine and masculine all at the same time....great job! I am your newest follower : )
ReplyDeleteThanks, Helen. I wasn't sure about the combining of these two aspects on the same piece but decided to keep going and see how it worked in the end. I am happy that I did. Glad to have you as a new reader.
ReplyDeleteFabulous. The process and the outcome are wonderful.
ReplyDeleteBEAUTIFUL PIECE, IT TURNED OUT FABULOUS! i would love to feature it, if that would be ok with you please let me know
ReplyDeletelauren
Wow I can appreciate all the intricate painting it took to get those filing areas complete.....love your projects!
ReplyDeleteSherry
GREAT MAKEOVER. SO MUCH LIGHTER. love all your detail.
ReplyDeleteOMG - absolutely incredible makeover - really really impressive ( I'm in love !!! )
ReplyDeleteWhat a lot of work! It looks great though. i just love that pop of colour on the inside - it must make you happy every time you open it :)
ReplyDeleteWow that is quite a transformation. very cool!
ReplyDeleteWow that is quite a transformation. very cool!
ReplyDeleteStopping over from your feature at Redoux to pin this baby. I love it!
ReplyDeleteBliss
Love how this tall heath turns out. You dud a great job with it. Thank you for sharing it at the link party at
ReplyDeletehttp://www.finecraftguild.com.