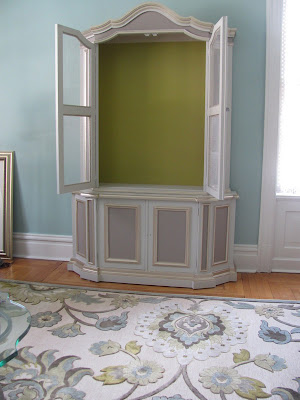
As you know I have been playing musical chairs with the furniture and this time the hutch from the dining room has landed in the living room.


 I went to work on it with a new color scheme and...
 some stenciling detail.
 Now it is in the living room and it
 needs could benefit from a new color scheme. To be honest, I still love it the way it is but I know it could look better than it does in this location.
 I decided I wanted some color behind the dishes. You can see where I tested a green I had on hand. It doesn't get much light and it seemed too blah.
 So I bought a quart of Benjamin Moore in Savannah Green.


 I wasn't exactly crazy about it but I convinced myself it would look better when I got rid of the pinky beige on the rest of the piece. I had some left over Winds Breath. I tried it but it was just too light. So back to the paint store for Revere Pewter. (BM HC-172) I painted the left side and I must admit that did help...some.
 I knew the raised trim pieces were adding to the confusion but, since I was flying by the seat of my pants, I was not ready to address that yet. Maybe a little prior planning would have helped, but in this case, I'm not so sure.
 Here everything has one coat except the raised trim pieces. They are still a metallic champagne color.
 I experimented with Coco Bolo in a metallic but it was too brown so I wiped that off. Unfortunately not fast enough and ...
 I was left with this. I had to give this some thought.
 Daylight was slipping away so I decided to wait until the next day to make the next decision.
 With a fresh perspective the next morning, I made some changes. Although it doesn't show in the photo, the lighter color looked purple to me. I had a can of exterior paint with no name on the can. Close as I can tell it might be Taos Taupe (BM 2111-40) I applied it to the panel on the right and immediately I knew it was an improvement.
 I covered over the panels on the right with the Taos Taupe, decided it was a go, and finished the other panels.
Now I had to come up with something for the trim pieces. I thought about shopping for another color but I really didn't want to waste so much time driving around for 3 oz. of paint.

 Turns out it was perfect! I was thrilled with the result (top panel with glaze, one under it without glaze, next down partially glazed, and bottom panel not glazed.) There was one problem... that pesky section of trim I messed up earlier.

 It is taking shape. I still need to second coat the body with the Revere Pewter and I also have to paint the inside behind the doors.


TEN DAYS LATER:

Ater living with this for awhile, I decided the piece was just too bossy for the room.


I am linking to: Miss Mustard Seed
Savvy Southern Style
No Minimalist Here

I have had this piece for about 18 years. I really like the lines and I love the storage.

This is what it looked like in the resale shop before I bought it.


The left one is Savannah Green. Mind you, I had not selected the colors for the outside of the piece, but that didn't stop me.

I forged ahead. While that was drying I started on the outside (without taking a picture first so this shot is from a little later in the process after I had put a coat on the outside)

I had some Shenandoah Taupe on hand and it looked like it might be right. I started filling in the panels and covering up the stenciling.


Now I had to come up with something for the trim pieces. I thought about shopping for another color but I really didn't want to waste so much time driving around for 3 oz. of paint.

My inner voice kept telling me to try the Ralph Lauren metalic I had on hand. I had already used it on the coffee table (later post) so I was hesitant to use it again but...it is a glaze and the finish color is dependent on the base color, so I gave it a whirl. You can see the slight change on the top right...just enough to take it from champagne to a more muted taupe.


I found this jar of Charred Lemon Gold Metallic. It was not the original champagne color but I knew that if it covered the brown streaks, the glaze would be enough to make it match. May I just say this is where frugality pays off. I save almost everything and, even though there was only a thin stiff layer on the bottom of this jar, I was able to add a little water and save the day.


I tend to leave the fun parts until last.

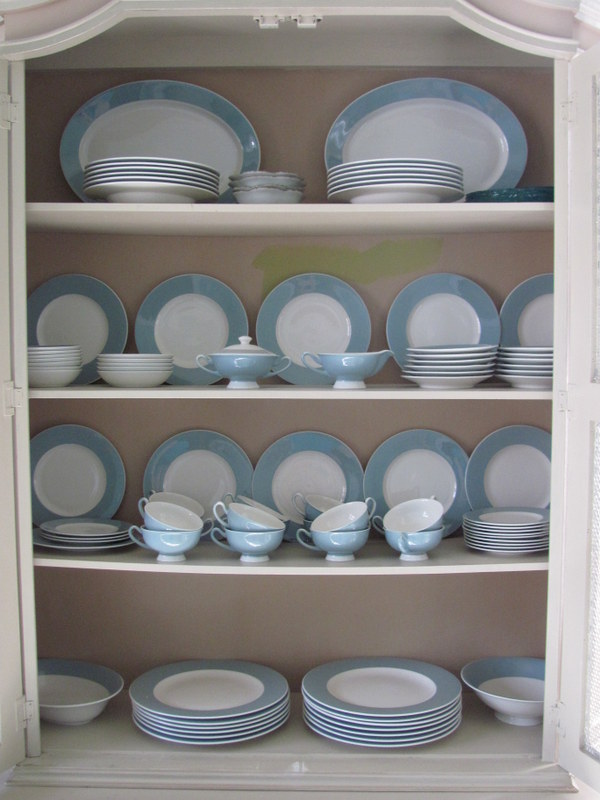
Now that the dishes are back into the top of the hutch, I'll have room to remove the bottom dishes. (I also have to address that slight sag in the first shelf from the bottom. It causes the dessert plates to roll towards the center.)

By the way, I bought this set of dishes at a resale shop for $100 in 2010.

Here they are for Christmas in 2011.
Maybe I'll be ready to host the holidays this year. I still have 10 months but we know how quickly that flys by.
TEN DAYS LATER:

Ater living with this for awhile, I decided the piece was just too bossy for the room.

So, I painted the panels again!

This time they are painted in Sherwin Williams 7031 Mega Greige.
I can't say this is final. I just finished second coating it today and I need to see if it settles in for the long run.
Am I questioning my ability to choose wisely? Not really. I figure it's like marriage. We don't always get it right the first time.
I am linking to: Miss Mustard Seed
Savvy Southern Style
No Minimalist Here
I know how it is when something is just not right. I have repainted a small chest three times and still not satisfied with results. I did love the green with your china. All the painting techniques were insightful.
ReplyDeleteWow, this piece has been through quite a few changes and I love the end result!! The colors look amazing and the green on the inside makes it pop even more! Great job :)
ReplyDeleteLove the turquoise on on the dishes with the taupes and green. Looks great with your rug.
ReplyDeletesuper cute
ReplyDeletelove the color on the panels! This piece looks so very nice in the room!
ReplyDelete