
Foyer Progress Report

The first thing on the agenda was to choose the tile for the face of the fireplace.
Next came laying it out in a manner that was pleasing to the eye without distracting cuts.

Finding the tile required a little legwork, but this is what I settled on.

Making it work was a bit more of chore for Danny.  Once the old tile was removed he had to level the base so that the 12x12 tiles for the hearth did not rock when in place.  Before he started that leveling process I took a picture.

My children's names had been drawn into the fresh concrete years ago so I thought I would share that memory with them.


A good layout plan resulted in some creative thinking and a lot of (ugh) math.
We decide to add a strip of wood flooring onto each end of the hearth to make five of the 12x12 tiles fit perfectly.  Luckily we had saved some of the flooring from the dining room tear out in preparation for the powder room.  (I know, slightly different color.  I'll deal with that if I deem it a necessity.)

I decided the mirrors were not not working with the new look so they came down along with the plaster behind them.

This added a little extra work to the project.

The corner to the right of the mirrors also required work.  The perpendicular wall dove into the corner to the tune of more than an inch in some spots.  That had to be leveled to make the next step in the process work.

Although it's hard to imagine, things were moving along.

The basic frame of the bookcases arrived. (Lying in front of the door in this picture)

This sent me into a frenzie of trying to pick paint colors so I could paint the walls behind the bookcases before they were installed.

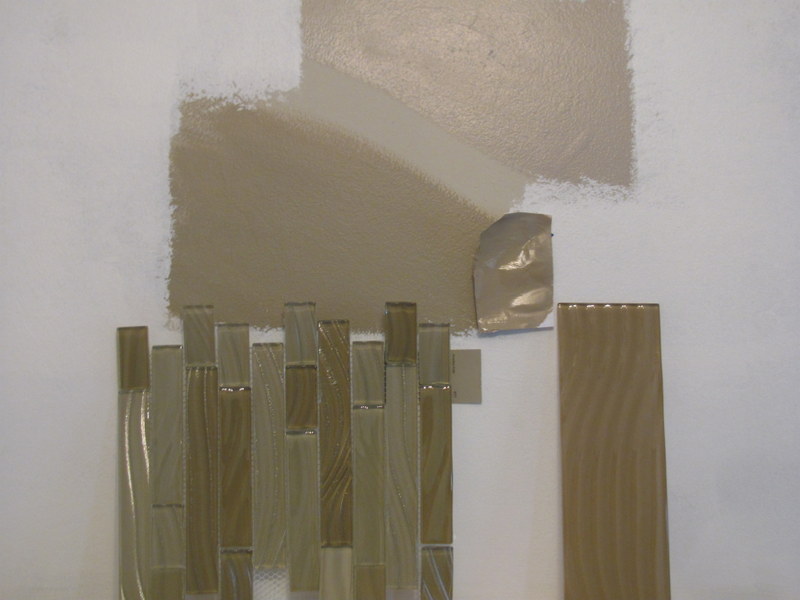
I drove myself a little crazy.  As you can see in this picture and the one above, the color of the tile changes on a dime.  It is freaky and nearly impossible to choose a color.  The glass tile has a ripple and I believe this adds to the unreliabilty of the color.  Hoping that once it is installed I will only be dealing with natural light vs artificial lighting, overcast vs sunny, and whether I am standing to the left or to the right.  I'm slapping my forehead and thinking of something stronger than a V-8.


I was convinced and then not so much.  After buying one gallon and then changing my mind, buying another color and coating the wall twice, I decided to STOP until the tiles were in place.

The bookcases would just have to go up and I would deal with repainting when I settled on the "right" color.

In the meantime I occupied myself with priming the woodwork and,


cleaning in, around, and through the radiator veins.


I also scrubbed the firebox and,

primed that for painting as well.


In my sparetime I'm searching for a new/preferably used chandelier.  This one at the Habitat Restore had possibilities, however, they had broken some of the globes.  (They really were not globes...more like large saucers...and, yes, they MADE the fixure...drat!)

I did some retail shopping too.  This one has dark gray shades that make it a classic beauty. I'm not sold yet.  Remember, I said retail, so I'll be doing a little more looking first.


This post is already getting a bit long, so I'm not going to bore you with that 1/16 of an inch here and the 5/8 inch there that have Dan and I pulling our hair out.  Let it suffice to say, there have been some delays, some scrambling to order more tile and then cancel it, lots of measuring, calculating, brainstorming and throwing in the towel until the light of a brighter day.

Here I'm trying to get a handle on the border tile.  I think I'll leave you with that visual until the next post.


Comments

  1. I'm so intrigued! Love that tile!

    ReplyDelete
  2. The tile should be installed in the next update. We are 1/2 way there. I'm excited to see it in place and post about it.

    ReplyDelete

Post a Comment

Popular posts from this blog

On The Upswing

After the last post, it seemed a good idea to do a follow up post to report that things are moving along nicely. This shot was taken before the remodel started.  The door at the end of the hallway leads into the bath now being remodeled. This is where the changes started.  The trim is off the doorway and the door opening will be enlarged to the width of the hallway. This shot taken of that same area now looks like this.  By closing the entrance from the hallway, that bathroom will now be the master bath by keeping the entrance from the bedroom only. This is how it looks from the bathroom side.  the door on the left leads to the hallway and the one on the right into the bedroom. Now it looks like this.  Part of the hallway has become part of the bathroom.  This is where the vanity will be installed.  The partial doorway you see on the right leads to the bedroom. Turning 180 degrees and looking across the room to the opposite corner, you see the window and the en

Out of No Where

Isn't it uncanny how a project can sneak into an already crowded schedule? Recently a friend invited me to do a walk through on a two-family he was planning to buy.  A couple pieces of furniture had been left behind and they were dumpster material to him.  Did I go with him thinking there was something there for me?   NO. Was I looking for something in particular? NO.  Did the thought of finding a new project ever cross my mind? NO!  But, see for yourself.  Could you have passed this up?  It was sturdy (translates to a little heavy). There was nothing wrong with it.  It even had all the shelves and the pins that hold them in place.  And without the shelves it was not quite as heavy.  (Try telling me that as my friend and I are hauling it down a flight of stairs.)  More shelving on the side made it even more practical.  I'm sure they could be used for something besides VHS tapes. Here it is in my studio where I could do a complete assessment.  Looks like a good cleaning

Small Storage Containers RECYCLED

 With the way grocery products have skyrocketed this past year, it has somehow made the containers they come in seem more valuable. To be transparent, I have always saved glass jars from jam, pickles, and spaghetti sauce.=) You know, small, medium and large. I also saved yogurt cups, sour cream containers, etc. When I was painting furniture and mixing colors, the small containers came in handy. This past summer I got a good laugh when I found a stack of yogurt containers in the back of a cabinet in my studio...at least 60! Needless to say those made it into the trash. More recently I have collected a fair amount of plastic containers with lids that are similar to the food saving containers you buy for that purpose. These are fairly large, about 5x7 inches and approximately 3" deep. They are great for leftovers but also good for storing a multitude of other smallish items. The bottoms are see through which makes them perfect for organizing hobby/craft and workshop items. But once a