There is a small area in my house where the staircase leads to the second story. The kitchen, dining room, and foyer all feed into this area that consists of a radiator and a few hooks for coats. It's basicly a short hallway with a stained glass window.
 Actually the window is on the landing going to the next floor but it is a nice focal point for this area. I had the design altered slightly from a picture I found at the library. This window was orginally stained glass as was the tradition in this neighborhood. However, it was removed by previous owners and replaced with amber plexiglass. Sorry, no picture. You would have loved it. (lol)
 This is taken from the second floor looking up to the third floor. You can see part of the stained glass window on the left.
 The stairs are open to the third floor and wind their way to the top.
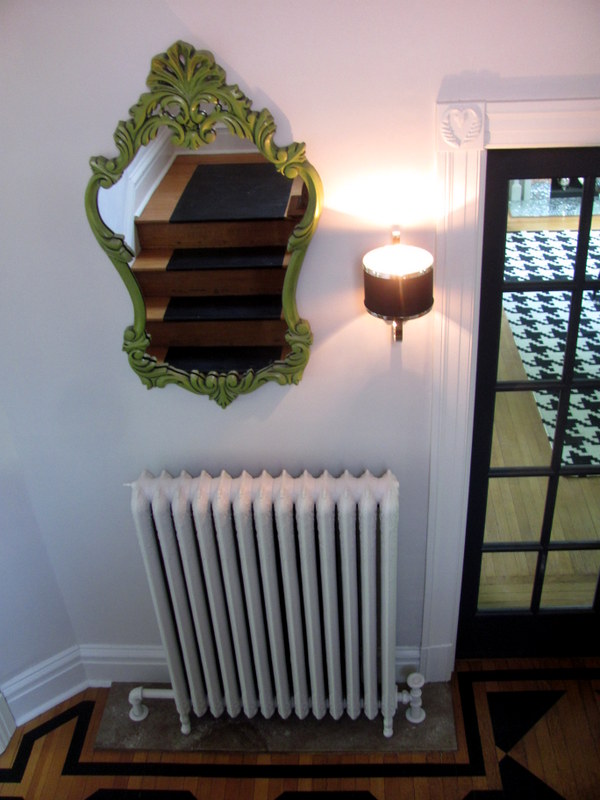
 The one wall opposite the stairs is mostly taken up with the radiator. It's nice to have a mirror on this wall to reflect what light you do get from the window.
 It is a fairly dark area and based on what I did with the rest of the first floor woodwork, it's no surprise that the trim in this area would get the same treatment.

 Just painting the trim around the doorways lightened the space considerably.

I decided to use a different mirror too.

This one I pulled from my stash.

Naturally it didn't stay gold.
 Art Mart has a nice variety of colors in spray paint.

I wasn't quite satisfied with the solid color,
so I added French Beret in the crevices and wiped off the excess.
 There really was nothing wrong with the other mirror, but as long as I was getting a fresh look, I changed this too.

The radiator needed to be a different color too. But what?
 Sticking with the idea of lightening this space, I painted it the same color as the wall. (Pale Oak OC-20)

The fixture I ordered on line. One small problem... the previous light had no switch on the wall...just a little turn button. The new fixture was not equipped with such a button. However, this is one of those times when a hiccup turns out to be a plus. Dan equipped my new fixture with a touch sensor and it's 3-way! Yay!!
 Then the dilemma became, "what to do with the staircase?" This was a tough call. I needed to make the staircase relate to the flip side of this area but whatever I did to the railing would carry right up to the second floor and....you get the picture. Transitions like this can be complicated.
 This is what I chose as a compromise. I painted the inserts of the paneling. What you see here is the primer with a strip of test color.
 I did not make them OC-23 like the trim paint. That was just too stark next to all that oak. Instead I painted them Winterwood. It's works well with the wood and it brings a lighter tone to that side of the space. I was able to limit the painting of the wood to the first level without looking like I stopped in an awkward spot. This picture was taken before the final coat.
 Plus, I got to patch and cover with paint some damaged areas in the paneling.


I finally decided on

I also wanted to get rid of the black baseboards on the stairs. This was a labor intensive job I wasn't willing to pay someone else to do. Ugh!
While this was getting done, Chuck was busy priming and painting the stairwell and second floor hall.
I opted for the Pale Oak all the way to the top. I don't intend to repaint this area for a REALLY long time and this was about as neutral as I could get. Besides it is light and brightens up these areas that get minimum daylight.


I decided to use a different mirror too.

This one I pulled from my stash.

Naturally it didn't stay gold.


I wasn't quite satisfied with the solid color,
so I added French Beret in the crevices and wiped off the excess.


The radiator needed to be a different color too. But what?


The fixture I ordered on line. One small problem... the previous light had no switch on the wall...just a little turn button. The new fixture was not equipped with such a button. However, this is one of those times when a hiccup turns out to be a plus. Dan equipped my new fixture with a touch sensor and it's 3-way! Yay!!


Here is a view from the opposite side. I had added the dado many years ago in an attempt to camouflage dirty little handprints from showing up on a white wall. I was now ready to go back although I must admit I find that I occasionaly steady myself on that wall now.
Notice the black baseboards...hmmm?

This shows it going away. I wish I could say it was simple and quick.

But there were other cracks and imperfections and this was the time to fix those too.

And as long as you're at it, right?

This process continued up to the third floor and lasted for three days. Then there was sanding and cleanup to prepare for priming and painting.
So much for simple.

Obviously I was not the one doing this work.

I got back into the picture when it came to the window. I washed, caulked and primed what I could reach. That upper right corner was just not accessible...to me anyway.

I persuaded Dan to prime that section.

I kept with my theme of painting the frame around the window in French Beret. The sill looks good in the same black. I'm waiting for Dan to come back with his ladder and and longer arms to finish the job.

If you recall, the baseboards going up the stairs were black. Now they are all light and bright with a coat of OC-23 Classic Gray. The walls are still about two weeks away from getting painted. I'm on the list and waiting my turn. Once the painting is complete, I will freshen up the floors and this area will be finished.

This is the view from the kitchen...the one room untouched by this renovation. You probably guessed the reason for that. $$$ =)
I realize I have not given you the final pictures of the foyer but I'm hoping to accessorize the shelves and have that ready for viewing by the next post.
I finally decided on

While this was getting done, Chuck was busy priming and painting the stairwell and second floor hall.
I opted for the Pale Oak all the way to the top. I don't intend to repaint this area for a REALLY long time and this was about as neutral as I could get. Besides it is light and brightens up these areas that get minimum daylight.
I like your change in the stairway. It will be gorgeous when finished. Also I love your new wall light in the non-room and the panels painted light make the whole area look so much more attractive! Way to go!!
ReplyDeleteM.N.