Those of you who have followed the facelift on my foyer have probably wondered why I never mentioned the painted floor that popped up in the pictures. I talked about every inch of the space without mentioning a floor that obviously played a fairly important role in the scheme of things.


 I painted up samples in an attempt to "get it right" this time.


 I was a little concerned about the fuss over a choice of window treatment that worked with the black diamonds only to throw the black out of the mix after the drape was chosen and hung. But, sometimes that's the turn it takes.


The simple reason behind that is, I was not sure how it was going to look with the makeover. And until the other changes were complete, I really did not have a plan for the floor.

Then a decision had to be made. Live with it, or don't.

I bought a little time for myself by having the floor screened. Even if the diamonds stayed black they needed to be refreshed and a light sanding was the first step in that process.

The stairs had taken a beating during all the rehab so they were definitely on my list.

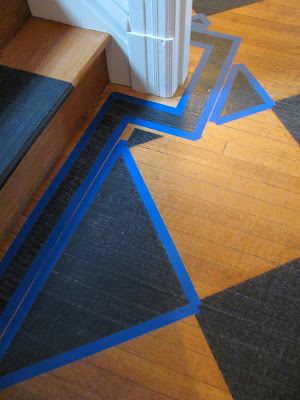
Next came taping off the edges. As you can see the taping had to be staggered to avoid overlapping.

This was a back breaking job. More on that later.

I bought what looked like a good color. After painting just a few diamonds and before it dried, I knew I could not live with this Grizzly Gray. Once it dried, I couldn't wait to change it. To what? The answer to that consumed me for the next 24 hours. I decided to use the original color as a basecoat. After all, almost half of the diamonds were already done in this color and I did have an entire gallon.

I drove the guys at the Paint Store crazy. I gave them a sample and asked for it darker, then darker still.

Each time I thought I had it, it would come out too light. This picture shows four different shades on the floor. It was making me crazy.

I finally settled on a color without knowing for sure if that was the right decision or even if there was a right decision. Then it was back to more taping and a repeat of the entire process... two more coats of paint on the remaining diamonds.

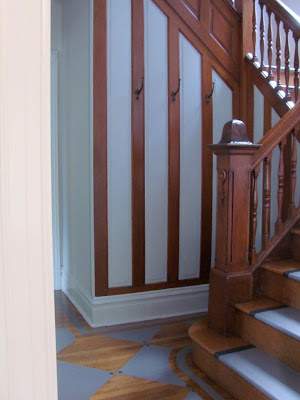
The steps were included in the taping process. Previously I had painted a runner on the steps. This time I decided to add a border to the runner. I painted that first in French Beret. (same color as the window sill you see in the upper right on this picture)

When that was dry I retaped them to cover the border and painted the runner gray. Sorry this really does not have a name because we added so much extra colorant. Let's just call it Last Resort.

They came out looking like this. There were some slight mishaps with the tape pulling up a tiny bit of the black but nothing major. There were also places where the paint bled beyond the tape line. The most obvious of those were addressed. Twenty years ago I might have cleaned up the fuzzy lines too but I was pushing my limits as it was. Besides, most of friends don't have perfect vision anymore anyway.

As the black began to disappear I started to get more comfortable with the gray.

When I pulled the tape off some apprehension crept back. It just didn't look complete. I brainstormed ideas to improve the look. Even starting over entered my mind but my back was screaming, "NO WAY!"

This was an idea I experimented with by painting some small black squares and cutting them out as a trial run. Then I slept on it for a night. The next day my back was still screaming. There was no denying a trip to the chiropractor. The rest of the day consisted of easing myself out of a chair and onto the bed and then reversing that motion. I thought a good night's sleep and my back would be normal again. WRONG! I guess because it took six days of crawling around on the floor to get this way, I was not going to get off that easy.

I was unable to do much of anything for a few days. Then my patience ran out. I figured out if I got onto my knees and draped my upper body over a small stool I could stencil these small squares on the floor. I'm sure I delayed my recovery with such foolishness but waiting is not my strong suit.
Five days after my back gave out completely the floor guys came back to apply the poly. I'm starting to heal but it is still a painful ordeal to maneuver myself out of bed every morning. It is such a relief to have someone else apply the poly. I gave some thought to doing this myself but given the turn of events, I'm very happy to relinquish control of the final step.

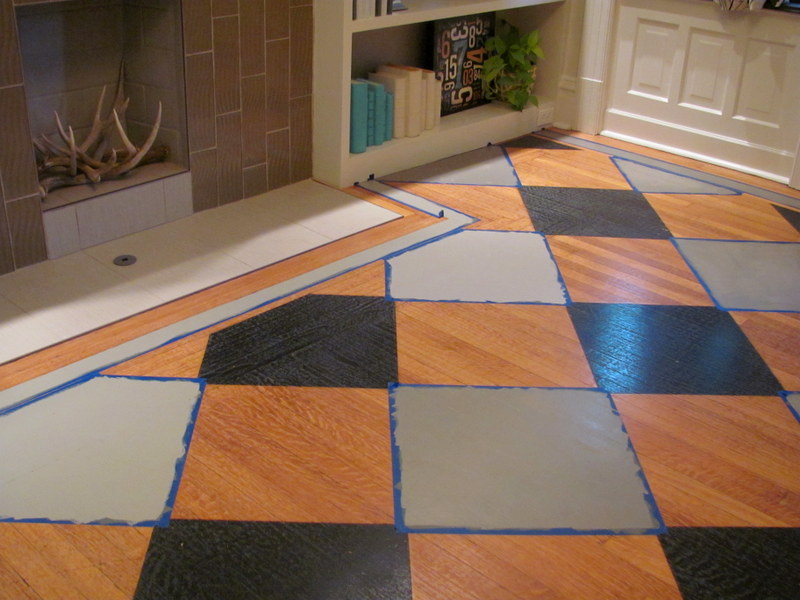
The fate of diamonds on the floor has been sealed.

Today is not the best day to get a good shot looking into this window but I am ready to publish and can't wait for overcast.


I am happy with the results and with another chiropractic treatment the memory of getting there will be forgotten.

Another milestone!

Now this is what greets me as I walk down the stairs to begin each day. For me change is good, especially if it involves home décor. There are so many choices and fabulous ways to make your living space beautiful. I believe that surroundings that appeal to your senses give back way more than you put into them.
I like the runner going down the steps with the border.
ReplyDeleteLove your diamond floor and your stairs! Also the border along the walls is amazing and adds so much. Your staircase, by the way is gorgeous!
ReplyDeleteThanks Quandie. Thanks for checking it out. We seem to have a similar aesthetic which is one of the reasons I enjoy your blog. I look forward to seeing your painting projects too. The books are fab, by the way.
ReplyDelete