In October this year my home will be one of three on a progressive wine tasting tour that has become a tradition in our neighborhood. I will be the second stop and will host the desserts. (There will be a later post on that....for sure!) The traditional oranges and yellows just are not working for me this year so I chose burlap as the cohesive element for my decorations. The texture gives it that hayride, bonfire, kind of outdoorsy feel. The natural colored burlap works like a neutral so it mixes well with a variety of colors.
 Nothing like an event to take stock and see what needs a little sprucing up. I started with the front porch. You know what they say about that first impression.


 By the time I had pinned the trim for one pillow I was wondering if maybe one would suffice.
 But I forced myself to stick with it and completed the second one the next day.
 Next in line was something for the front door.


 Also, the back of the frame is flat which made it a lot easier to hot glue my arrangement to it. The first thing I did was cut the bamboo into smaller lengths and glue it to the frame. Guess I forgot to get a picture of that. The lengths were uneven and overlapped on the corners.


I made some burlap roses that were just too much for this arrangement.
 So I had to use them on something else.


I will have three bar height tables in my backyard for this event with ivory tablecloths on them. I am thinking of adding crisscross runners in the burlap webbing with the black stitching. An alternative is to use these buckets I bought at a yard sale a few years ago.
 I added burlap squares to these with hot glue.
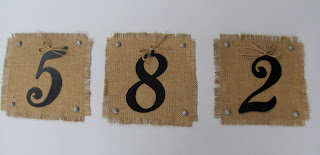 I had picked up these metal numerals at Hobby Lobby to use as stencils somewhere down the road. The studs in the corners are upholstery tacks painted a dull silver. (primer) I clipped the nail part off and attached them to the burlap with hot glue.
 When it gets a little closer to the event, I will add a pot of mums to each of these. They may be too tall or bulky for centerpieces. If so, they will work on the front steps.
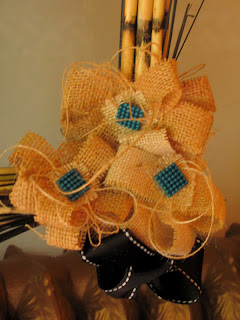
My last "burlap" piece is the door decoration for the door to the garage. It will be front and center as it faces the back yard, so it does need something.


My porch swing pillows looked faded and tired so I decided to start there.

I had noticed earlier this summer that the stores were no longer showing just solid colored burlap. I made a quick trip to JoAnn Fabric and picked up a 1/2 yard of this snappy typographic print.


I found a few things at Hobby Lobby and started with those. In the end, I opted not to use the ribbon but I know it will come in handy somewhere else.

I took a picture frame I had and sprayed it black. This will be the backside of the arrangement.

I wanted the backside of the arrangement to look decent from the inside of the house.


I removed the zipper from the old pillow casings and rolled them into a rosette for the centers of my store bought flowers.

They needed a tiny dab of glue here and there as I rolled them into place

Then I made these burlap flowers from 1" wide strips of burlap. I added the buttons from my stash.

After I made a few, I decided to make the centers a little more interesting so put a little burlap square behind the button and made a few like that. (There are instructions for the burlap flowers here.)

I also switched to a little darker shade of burlap for added variety.

I hit the wall on this for a day or two. I wasn't happy with it and I couldn't figure out what to do to make it better.

Then I accidentally looked at it upside down and that seemed to do it. Lesson: When you are stuck, look at the problem while standing on your head.

I moved on with adding bits of ribbon and some little pod looking things I had on hand. Then I hung it from these rings, but because my hooks on the frame were not level, I could not get the rings to hang level....fixable I know, but maybe the rings were too much anyway.

I hung it with fishing line instead. What do you think? Rings or no rings?

I made some burlap roses that were just too much for this arrangement.


I had this metal box and the webbing.

I hot glued the webbing to the inside of the box and added the burlap rose.

As soon as the hedge apples are in season I am going to fill this to overflowing and use it as the centerpiece on my sun porch.
I will have three bar height tables in my backyard for this event with ivory tablecloths on them. I am thinking of adding crisscross runners in the burlap webbing with the black stitching. An alternative is to use these buckets I bought at a yard sale a few years ago.


My last "burlap" piece is the door decoration for the door to the garage. It will be front and center as it faces the back yard, so it does need something.

My door is painted a charcoal color so I thought this would be a nice pop of color. I pulled the red sunflowers from a previous arrangement. I purchased the burlap ribbon and the white sunflower. The beads I picked up last weekend at an estate sale and the cone I have had and used many different ways over the years. The reason this arrangement is not finished is that I am waiting to find corn husks as my filler. I want it to be full and abundant looking. Besides the corn husks will be about the color of the light beads and they will add some brightness to the black door.
So, there you have it. This Fall, burlap is my theme. I still have the inside table decorations to do and the luminary and twinkle lights for outside. I have some things in mind so that should be fodder for a future post. Oh, and just in case your were wondering, I am not making the desserts. They are being made by a neighbor who bakes everything herself and has done this for several years for the neighborhood party. Trust me there will be pictures and maybe even a recipe or two.
I am linking to: Fox Hollow Cottage
Yellow Bliss Road
Looking good! I think I like the rings on the front door arrangement. Your front and back is going to be gorgeous for the event!
ReplyDeleteI LOVE all the Burlap and flowers here. The rosettes are So very Pretty and the Numbered Galvanized buckets are really Cute!! Thank you so much for sharing these at our All about Burlap party!!
ReplyDeletexoxo
Angelina
Everything looks great! I love all the different flowers, and the numbered buckets. I found your link at Cupcakes and Crinoline burlap linky party. Thanks for sharing!
ReplyDeleteLinda