
From Clock Cabinet to Grotto

 
 When I bought something similar, I just thought it was a niche.


I liked it so I bought it.
Someone noticed it in my studio and asked if it was an old clock cabinet?  I knew it probably was not going to be what ever it used to be, but at least now I had a clue as to what that was.

 
Traditionally they looked more like this. I guess mine might have had a door at one time.

They came in various styles.

Mine needed a little wood filler here and there.

The short sides on the base had fallen off so my nephew reattached them for me. (Actually, they were fine when I bought it but it sat so long in my studio, the glue gave out.)

I had an idea for this piece that involved painting it first.  I have been wanting to try the formula for making chalk paint and this seemed like the right opportunity.  I mixed 2 Tbsp. of  a free sample paint from Valspar with 1 Tbsp. of Plaster of Paris and 1 Tbsp. of hot water.  This was enough to paint the entire piece, including the back, with two coats.

For the next layer I used one Tbsp. of the same paint and 1 Tbsp. of white paint along with the water and Plaster of Paris.  I distressed it some and decided I didn't like the fact that I could not see any of the original color.
 
So, I repainted it again with the first color formula and distressed it again.

I also glued a sheet of decorative paper to the inside back.
 
And then I gave everything, including the paper, a coat of wax.
 
NOW WHAT?
I checked pinterest to see what others were doing with their clock cabinets.

(acase of curiosities.com)
This one is more sophisticated than mine.  Nicer wood, well made, and beautiful detail in the half columns.

Here is an example of one with the door intact.  I think they added a shelf so they could display more tiles.

Creative applications abound.

(vintiquesboutique.com)
I did find one that was painted.
 
But back to my project.
 
I had been tossing around ideas for using old keys and some medals and crosses I had saved.
I decided this might be the right opportunity to use them.

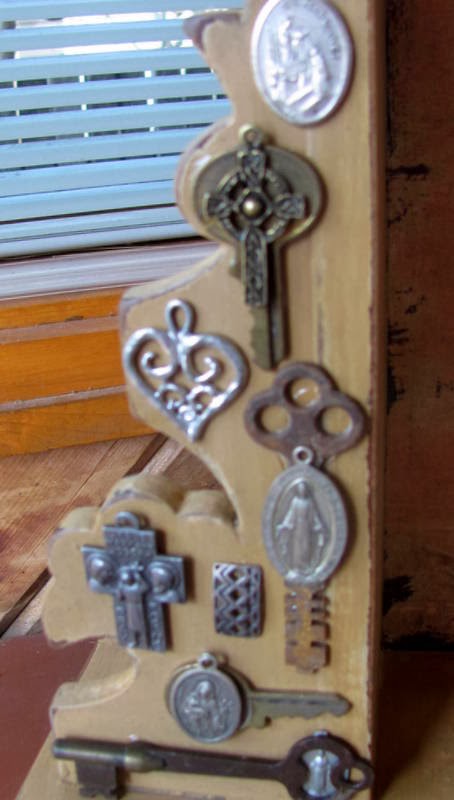
I laid them out first.

 
 And then glued them in place.

I added a few more after this picture was taken but there are still spaces that I will fill in when I find something I think works with what is already here.
 
I have an old statue of St. Anthony that I wanted to use inside the grotto.  He is already slightly worn so he was perfect.  No distressing needed.

 That's it.  Finished.
 

 I had some tiny votive lights that are the perfect size to fit on either side of the statue.
I took these photos standing on a stool, and as you can see, an unsteady one at that.

A do-over might be in order tomorrow.


But for now, one more to-do project is ta-done.


I tried taking a few more before I published this post. 


 I just can't quite capture it.  It looks better to my eye than it does in the photos.


Comments

Post a Comment

Popular posts from this blog

On The Upswing

After the last post, it seemed a good idea to do a follow up post to report that things are moving along nicely. This shot was taken before the remodel started.  The door at the end of the hallway leads into the bath now being remodeled. This is where the changes started.  The trim is off the doorway and the door opening will be enlarged to the width of the hallway. This shot taken of that same area now looks like this.  By closing the entrance from the hallway, that bathroom will now be the master bath by keeping the entrance from the bedroom only. This is how it looks from the bathroom side.  the door on the left leads to the hallway and the one on the right into the bedroom. Now it looks like this.  Part of the hallway has become part of the bathroom.  This is where the vanity will be installed.  The partial doorway you see on the right leads to the bedroom. Turning 180 degrees and looking across the room to the opposite corner, you see the window and the en

Out of No Where

Isn't it uncanny how a project can sneak into an already crowded schedule? Recently a friend invited me to do a walk through on a two-family he was planning to buy.  A couple pieces of furniture had been left behind and they were dumpster material to him.  Did I go with him thinking there was something there for me?   NO. Was I looking for something in particular? NO.  Did the thought of finding a new project ever cross my mind? NO!  But, see for yourself.  Could you have passed this up?  It was sturdy (translates to a little heavy). There was nothing wrong with it.  It even had all the shelves and the pins that hold them in place.  And without the shelves it was not quite as heavy.  (Try telling me that as my friend and I are hauling it down a flight of stairs.)  More shelving on the side made it even more practical.  I'm sure they could be used for something besides VHS tapes. Here it is in my studio where I could do a complete assessment.  Looks like a good cleaning

Small Storage Containers RECYCLED

 With the way grocery products have skyrocketed this past year, it has somehow made the containers they come in seem more valuable. To be transparent, I have always saved glass jars from jam, pickles, and spaghetti sauce.=) You know, small, medium and large. I also saved yogurt cups, sour cream containers, etc. When I was painting furniture and mixing colors, the small containers came in handy. This past summer I got a good laugh when I found a stack of yogurt containers in the back of a cabinet in my studio...at least 60! Needless to say those made it into the trash. More recently I have collected a fair amount of plastic containers with lids that are similar to the food saving containers you buy for that purpose. These are fairly large, about 5x7 inches and approximately 3" deep. They are great for leftovers but also good for storing a multitude of other smallish items. The bottoms are see through which makes them perfect for organizing hobby/craft and workshop items. But once a