One wall in the kitchen is making dramatic strides towards completion. Here is where it all started.


 This Craig's list find became...
 this, with a little paint. (that process is covered here)
 It sat in place waiting patiently for six weeks for the tile to arrive. But, even when the tile came, there was another two week delay waiting for the counter tops.
 During that wait I laid the tiles on the floor to develop the best strategy for installation. The trick was to not have narrow pieces of tile on each end. It was a collaborative effort to determine how best solve that problem. Brother John suggested butting the tiles as close as possible thereby creating about an inch on each end but that was still a narrow piece of tile.
 In the end it was Dan who suggested pieces of angle iron on each side to avoid the narrow strips of tile. It was the perfect solution. I cleaned and waxed the iron before it was adhered to the wall.
 Here you see Ron as he begins affixing the first row of tile.
 So far, so good.
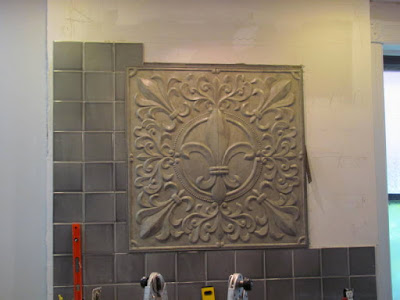
 The guys did have to lower the fleur de lis about 3/4 of an inch because, in the strategic planning when we decided to push the tiles as close to each other as possible, we changed the vertical measurement as well. So by lowering the medallion, we were then able to put exactly three rows below this centerpiece.
 Inching our way upward.
 Yay! Metal sides are not attached yet. The outlets need to be installed. And it still has to be grouted with Delorean Gray. But even in this stage, it's lookin' good.
Oops, another delay. The 1" metal strips, because of the thickness of the steel did not quite meet the tile. So they had to be exchanged for 1 1/4" pieces, then cut, cleaned, and installed. Another waiting period as the guys finished up another job somewhere else.
 Finally it was grout day.
 Even though the tiles were pushed tightly together on the back side, they were slightly beveled towards the front so the grout lines show up a little more than I expected.
 TaDAH! Taken late in the afternoon on a rainy day. I'll try for a better shot tomorrow and maybe the outlet on the right will be in place. (screws too short so another mini delay)
 Still have not fixed the outlet on the right.
 But the one on the left looks good in the brushed nickel finish.
 I'm still working on the recessed lights. I finally found bulbs that don't bath everything in a yellow cast. Instead of replacing the baffles at $17 apiece, I spray painted them.
 They went from black to silver so easily.
 Getting them reattached with these crazy little springs was a nightmare and took a lot longer than spray painting.
 I couldn't manage the one over the stove so I'm waiting for someone with longer arms. I got five out of six without getting violent, but I couldn't get this one without standing on the stove. That's where I drew the line.
If you are wondering about that pendant light hanging in the middle of no where...then hold that thought. I'm hoping that will be the next post.


Once the overhead cabinets were down, the flue wall was expanded to the left, about where the first outlet is above the base cabinet in the first picture.


Oops, another delay. The 1" metal strips, because of the thickness of the steel did not quite meet the tile. So they had to be exchanged for 1 1/4" pieces, then cut, cleaned, and installed. Another waiting period as the guys finished up another job somewhere else.


If you are wondering about that pendant light hanging in the middle of no where...then hold that thought. I'm hoping that will be the next post.
Comments
Post a Comment