
Restaurant Progress Report

Some walls have been shaved back since the last post.  The area at the bottom of the stairs needed to be opened up visually and to provide easy access between the two sides of the first floor.  The wall in the foreground on the right will also be moved back to the conduit you see running up the wall.

 That means this alcove will not be as deep.  But this doorway is being changed to a fixed glass right behind the stone arch.

 That will leave room on the inside for a hostess station.


Even though this beautiful tile is in perfect condition, it will be covered to make the floor level with the floor at the bottom of the stairs,  Some battles you just can't win.


This is taken from the front on the left side of the building.  There is a hallway to a back exit with two bathrooms off this hallway.  The plywood leaning against the studs is where the kitchen starts.  It extends across the back to the east wall of the building.

This is just a close up of the bathroom framing.  Those support poles you see on the floor are required and not designated for a location that is ideal but, as I said, some battles cannot be won.

This shot is from the front of the building on the right side.  The doorway in the back will become the entrance to a walk in freezer that extends out the back of the building.

This close up shows the space designated for the kitchen.  Initially plans were to have some of the storage and freezer space, along with some prep tables, in the basement.  Than plan has changed with the walk in freezer out back.  The basement will still be used for supplies.

Notice the handrails that curve along the stairs to the top.

Both sides wrap around at the top so there will be two columns where the railings attach.

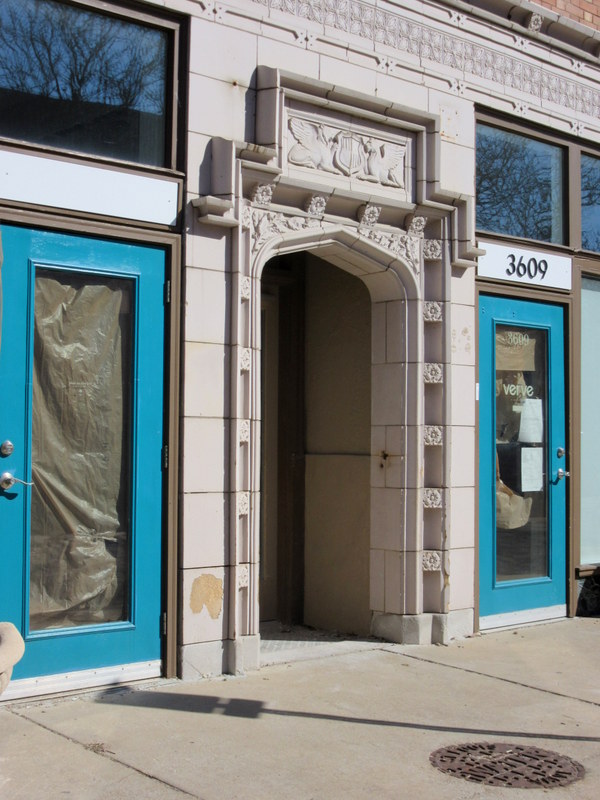
Originally this staircase was enclosed to the ceiling. The plan now is add a 22 inch wall on each side and leave the end over that red area for a gate that was once on the outside of the building.  It was used  to enclose the recessed area behind the stone arch.  Because the height of the sides needs to be 42 inches, an iron railing will be added on top of the short wall.

This is the back of the second floor.  Note the amount of brick showing above the windows.


This is the front of the building which shows more exposed brick. Due to the slope of the roof the ceiling will be higher in the front.  It would be great to keep this exposed but a sprinkler system and  insulation will be added.  Then a sound absorbent ceiling will be added over that. 

There are three large I-beams that will be exposed below the ceiling.

Directly at the top of the stairs there is a raised area that was once a skylight.  It will remain open to the floor below but, for now, no skylight will be installed.  The recessed area starts above the black I-beam in this picture.  The recessed area is approximately 4'x11'.

This is taken from the front of the building.  The bar is on the right with the satellite kitchen behind that and a bathroom next.  There will still be room for tables beyond that in front of the windows across the back.

This shows the kitchen and bath area looking from west to east.  You can see the top of the staircase on the right.

Across from the kitchen and bath, on the opposite side of the room. will be two banquettes.
As you can see the building has a jog on this side, so one banquette will be larger than the other.

Here is the same area shot from the back of the building.

You may have noticed an exit on the back of the second floor,  This leads to a small deck and a set of stairs to the ground.  The Ritz park is directly behind the restaurant building.  It is an event park for the Grand Business District and hosts festivals, movies, yoga, and booths for various local activities.


Comments

Popular posts from this blog

On The Upswing

After the last post, it seemed a good idea to do a follow up post to report that things are moving along nicely. This shot was taken before the remodel started.  The door at the end of the hallway leads into the bath now being remodeled. This is where the changes started.  The trim is off the doorway and the door opening will be enlarged to the width of the hallway. This shot taken of that same area now looks like this.  By closing the entrance from the hallway, that bathroom will now be the master bath by keeping the entrance from the bedroom only. This is how it looks from the bathroom side.  the door on the left leads to the hallway and the one on the right into the bedroom. Now it looks like this.  Part of the hallway has become part of the bathroom.  This is where the vanity will be installed.  The partial doorway you see on the right leads to the bedroom. Turning 180 degrees and looking across the room to the opposite corner, you see the window and the en

Out of No Where

Isn't it uncanny how a project can sneak into an already crowded schedule? Recently a friend invited me to do a walk through on a two-family he was planning to buy.  A couple pieces of furniture had been left behind and they were dumpster material to him.  Did I go with him thinking there was something there for me?   NO. Was I looking for something in particular? NO.  Did the thought of finding a new project ever cross my mind? NO!  But, see for yourself.  Could you have passed this up?  It was sturdy (translates to a little heavy). There was nothing wrong with it.  It even had all the shelves and the pins that hold them in place.  And without the shelves it was not quite as heavy.  (Try telling me that as my friend and I are hauling it down a flight of stairs.)  More shelving on the side made it even more practical.  I'm sure they could be used for something besides VHS tapes. Here it is in my studio where I could do a complete assessment.  Looks like a good cleaning

Small Storage Containers RECYCLED

 With the way grocery products have skyrocketed this past year, it has somehow made the containers they come in seem more valuable. To be transparent, I have always saved glass jars from jam, pickles, and spaghetti sauce.=) You know, small, medium and large. I also saved yogurt cups, sour cream containers, etc. When I was painting furniture and mixing colors, the small containers came in handy. This past summer I got a good laugh when I found a stack of yogurt containers in the back of a cabinet in my studio...at least 60! Needless to say those made it into the trash. More recently I have collected a fair amount of plastic containers with lids that are similar to the food saving containers you buy for that purpose. These are fairly large, about 5x7 inches and approximately 3" deep. They are great for leftovers but also good for storing a multitude of other smallish items. The bottoms are see through which makes them perfect for organizing hobby/craft and workshop items. But once a