Small Storage Containers RECYCLED

 With the way grocery products have skyrocketed this past year, it has somehow made the containers they come in seem more valuable. To be transparent, I have always saved glass jars from jam, pickles, and spaghetti sauce.=) You know, small, medium and large. I also saved yogurt cups, sour cream containers, etc. When I was painting furniture and mixing colors, the small containers came in handy. This past summer I got a good laugh when I found a stack of yogurt containers in the back of a cabinet in my studio...at least 60! Needless to say those made it into the trash. More recently I have collected a fair amount of plastic containers with lids that are similar to the food saving containers you buy for that purpose.

These are fairly large, about 5x7 inches and approximately 3" deep. They are great for leftovers but also good for storing a multitude of other smallish items. The bottoms are see through which makes them perfect for organizing hobby/craft and workshop items.

But once again, does anyone need sixty of these taking up space only to be found five years from now in the back of a cabinet?  Of course not.  And yet, you know I wasn't going to just pitch them. With the holidays on the horizon, I had the thought to give them to my neighbors, friends, and even some of my relatives for Christmas. NO, not empty! I'm not sure yet what will be inside but they would be good for homemade granola, fudge, peanut brittle, brandied fruit, cranberry salsa, candied pecans, bite-size cookies... the list is endless.

The contents are to be determined.  For now I needed to make the outside of the container look more inviting. I hit several stores looking for those small decorative picks that were a cluster of three or four complimentary items and sold for 79 cents. Now one skimpy sprig of artificial greenery is marked $1.79. I was pretty sure I had better looking materials in my storage bins at home.

I had to do some digging but I came up with a few items that included wrapping paper, ribbon, buttons, sequins, beads, small ornaments, stickers, and some old Christmas cards. With those, a pair of scissors and my glue gun, I set to work.

This project became a challenge to see if I could decorate 12 lids from items I could scavenge from my own closets.


Not because I was trying to be frugal, but rather because I didn't see anything in the stores that appealed to me and was worth the price.

I save Christmas cards that I think I might recycle in some way.  I was happy to add some sequins to this one and finally use it.

I'm sure my friend will know this one wasn't lying in a drawer for a year or more.  It in fact came in the mail yesterday.  I couldn't resist putting such a cute little snowman to good use. She repurposes too so I doubt she will mind.

The little metal circle layer on top of the striped circle says JOY.


And this label says Santa Claus.

I don't really need all these so my plan is to give some to my daughter. She always gifts her neighbors with a little treat of some kind.

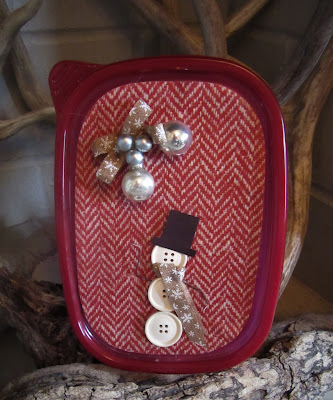
And now the only thing left to do is fill them with something tasty.

Comments

Popular posts from this blog

On The Upswing

After the last post, it seemed a good idea to do a follow up post to report that things are moving along nicely. This shot was taken before the remodel started.  The door at the end of the hallway leads into the bath now being remodeled. This is where the changes started.  The trim is off the doorway and the door opening will be enlarged to the width of the hallway. This shot taken of that same area now looks like this.  By closing the entrance from the hallway, that bathroom will now be the master bath by keeping the entrance from the bedroom only. This is how it looks from the bathroom side.  the door on the left leads to the hallway and the one on the right into the bedroom. Now it looks like this.  Part of the hallway has become part of the bathroom.  This is where the vanity will be installed.  The partial doorway you see on the right leads to the bedroom. Turning 180 degrees and looking across the room to the opposite cor...

Out of No Where

Isn't it uncanny how a project can sneak into an already crowded schedule? Recently a friend invited me to do a walk through on a two-family he was planning to buy.  A couple pieces of furniture had been left behind and they were dumpster material to him.  Did I go with him thinking there was something there for me?   NO. Was I looking for something in particular? NO.  Did the thought of finding a new project ever cross my mind? NO!  But, see for yourself.  Could you have passed this up?  It was sturdy (translates to a little heavy). There was nothing wrong with it.  It even had all the shelves and the pins that hold them in place.  And without the shelves it was not quite as heavy.  (Try telling me that as my friend and I are hauling it down a flight of stairs.)  More shelving on the side made it even more practical.  I'm sure they could be used for something besides VHS tapes. Here it is in my studio w...

Behind The Scenes

There is always so much that has to happen in a rehab that can't be documented as easily as progress photos or before and after shots.  Hours are spent selecting tile, choosing the perfect wall color, and even figuring out what shade of grout will make that tile sing. Then comes weighing in on the best pattern for tile layout. The internet is invaluable when searching for light fixtures, but it can also take you down the rabbit hole with the thousands of choices. This one is actually as long as it looks--48 inches.  Hopefully it looks good in place. (I know, weird looking.  It's upside down in this picture.) Speaking of getting lost scrolling through products on line, I got sidetracked for hours on one site that had 27,877 shower curtains. SERIOUSLY!!  It's easy to lose focus, Then there are faucets and shower heads to think about.  EDUCATING YOURSELF ON THIS TOPIC SHOULD BE WORTH A COUPLE  HOURS OF COLLEGE CREDIT A ...