Last Saturday was a bonanza day for garage sales. Of course, there were way more than I could possibly take in, but I managed to hit 28 before 10:30. There were 14 in Compton Heights that opened at 9 a.m. so I had 11 under my belt by the time I got here.
 It was at this point that it started to rain. One homeowner was handing out umbrellas to her customers to keep them at her sale. It worked for me. I stayed long enough to poke thru a box and came up with these two mirrors.


Expect to see these in a later post when I figure out what I am doing with them.
The next stop was not offering umbrellas but I did find some little garden lights stuffed in a basket. For obvious reasons I did not spend much time looking them over. For $2 I didn't think I could go too far wrong. I did have the seller plug them in to make sure they worked. That is when he discovered I was also getting the extension cord for my two bucks. I paid the man and started to gather them into my arms. "Oh no," he said. "If you don't take the basket I'll have to charge you more." So, of course, I took the baset too.

 Turns out there was a basket inside the basket and there were two sets of lights inside the baskets. My $2 purchase seemed like a real bargain.
I knew from the get go that I wanted to paint my little lights. I also knew that would require a bit of time to disassemble and reassemble them and I was prepared for that.
 What I wasn't prepared for was the amount of rust. But I was committed to seeing this through 'till the end. It wasn't about the money, folks. And it wasn't about the value when completed. I was told they came from Restoration Hardware and if it was about my time I could have purchased new ones.
 So what
is this
about,
really?
I think it's therapy. Anyone reading this blog probably gets that, so further explanation isn't needed.


You can see by the lids that Better Times is a deep berry color.
I won't bore you with the reassembling. Suffice it to say that getting four of those little plastic windows in place for 20 lights was not the therapy I was looking for.


I am finding that getting good photos of finished works is tougher than it looks. Sometimes the set up takes longer than the refinishing of the project itself. Turns out that looking through the view finder was not sufficient enough for me to notice the ORANGE extension cord draped across the lawn.


I have entered "Paint Something A Fun Color" at:


Expect to see these in a later post when I figure out what I am doing with them.
The next stop was not offering umbrellas but I did find some little garden lights stuffed in a basket. For obvious reasons I did not spend much time looking them over. For $2 I didn't think I could go too far wrong. I did have the seller plug them in to make sure they worked. That is when he discovered I was also getting the extension cord for my two bucks. I paid the man and started to gather them into my arms. "Oh no," he said. "If you don't take the basket I'll have to charge you more." So, of course, I took the baset too.


I knew from the get go that I wanted to paint my little lights. I also knew that would require a bit of time to disassemble and reassemble them and I was prepared for that.
 What I wasn't prepared for was the amount of rust. But I was committed to seeing this through 'till the end. It wasn't about the money, folks. And it wasn't about the value when completed. I was told they came from Restoration Hardware and if it was about my time I could have purchased new ones.
is this
about,
really?
I think it's therapy. Anyone reading this blog probably gets that, so further explanation isn't needed.

I removed the worst of the rust and coated them well with a good primer coat.
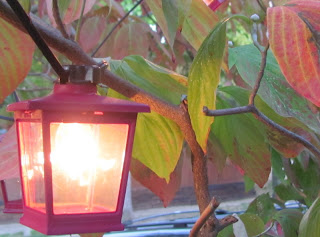
I chose a Montana paint #3160 called Better Times for the final coat. I am counting on the name to be an omen for the future.

You can see by the lids that Better Times is a deep berry color.
I won't bore you with the reassembling. Suffice it to say that getting four of those little plastic windows in place for 20 lights was not the therapy I was looking for.

But patience prevailed.

Once they were back together I strung them in my dogwood tree for pictures. Let me just say that hanging anything is not my activity of choice. As usual, I went for the effect first. Getting the lights placed just where I wanted them only to find out the correct end for attaching my extension cord was at the very top vs the hidden option at the bottom. Some shuffling and I was ready for "lights please." #*//! Now what? Determination won out over frustration and after some detective work, I figured out that the little red button on the outlet needed to be reset before I was going to have power.

Finally, a project that was completed in a day.

I have so many projects that are on hold for various reasons that I really needed to take on something I knew I could finish.


And for those times we have cropping. Maybe not the shot I wanted but, live and learn.

All in all, I think I got my $2 worth of fun.
I have entered "Paint Something A Fun Color" at:
More great finds. Love the lights.
ReplyDeleteThose are great finds! The right kind of lights can complete a garden landscape and accentuate areas which you want to give focus on. Moreover, outdoor lighting can serve as an instant deterrent against burglars. You don’t have to worry about keeping your lights switched on all night because there are low-voltage lights that won’t consume too much energy.
ReplyDeleteChristian Spino