For those of you who checked in lately and found nothing new, I apologize. My unexplained and unexpected absence was definitely justified. No, I was not in Tahiti with someone I just met online. It was far less fun, although maybe as dangerous. And, no, I don't have pictures. It was a bad reaction to a detox. Not the kind that requires checking into a rehab facility. Just a simple internal body cleanse. The details are boring unless you are the one having the reaction, so I'll skip to the present. I am slightly behind on projects but I will share a mini one that I worked on when energy permitted.
Some of you may remember a post from way back. I called it, "Where's the Sink?"

This was back in 2010, so for more pictures, click on the link above.
Moving on to why we are revisiting this piece again. When I posted about this in 2010, it was because I had just freshened up the outside paint job. Finally, four years later, I am getting around to freshening up the inside.

I bought this round mirror at an auction. I did not pay much for it because I'm sure you noticed the loop de loops from the glue someone used to attach a backing to the mirror. I have chosen to ignore that, and use it anyway, because I happen to like the painting on the mirror.
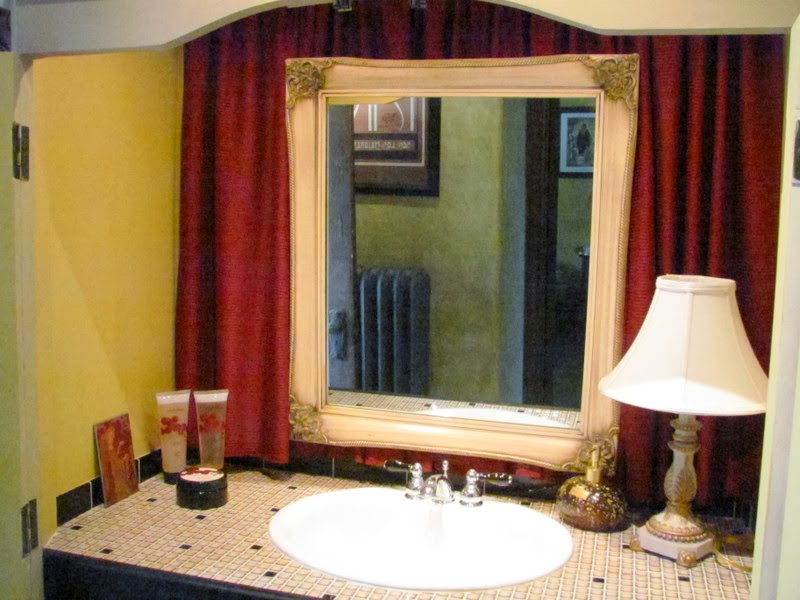
It will replace this mirror.

Of course, it is never just one small change. The curtain behind the mirror must be changed and the wall color inside the cabinet must change too.

I was determined to use paint I had on hand for this small job.

Measuring by tablespoon I concocted several shades of fleshy pink. I ended up painting it three times before I gave in and said, "good enough." Actually, somewhere in there, I decided to go buy the paint and be done with it, but when I dug out the paint decks, I couldn't find a color that was better than what I had mixed.
This is the fabric I chose to put behind the mirror. It is the slinkiest material I could have chosen and was a bit of a hassel getting it to stay on the sewing table. Obviously just as much trouble for the professional cutters at JoAnn's. When I got it home and laid it out, it was 2" short of two yards on one selvage and 3" short on the other. And, of course it was cut crooked on both ends! Whatever! I had to make it work.

Next job was moving the hooks in to accommodate the size of the new mirror. My "over-the-head" arm strength is pretty much worthless and reaching over the sink with my head stuck in the armoire didn't allow me to put any pressure on the drill. So, that was a wait-for-help moment. But help did come and I was able to finish that part.

I rather like it without the mirror but I do really need a mirror here.

The weight of the mirror against the fabric flattens out the soft folds a bit but again, whatever!

Now for the doors. I decided to remove the fabric inserts rather than try to paint around them.


I debated about showing you the full view since my shelves are a mess. But, it's time to move on to something else. Please excuse that part.

I'll find the right thing to put in the vases or switch them out for something else.

I know I'll revisit this project and tweak it when I'm up to speed. But for now, it's enough to let you know there will be more on the way soon.
Always so clever!
ReplyDelete