I have been stalling a little hoping one thing or another would come together for a post. That has not exactly happened as of yet. Not for lack of trying, mind you! So, let's talk about that. On high priority right now is the island. Since I talked about it in this previous post, I have hopped all over the place with possibilities.

Dan suggested using one of the large tool boxes. I liked the smooth gliding drawers and the ability to separate all those kitchen utensils in such an organized fashion. I scoped them out on line and everywhere else that carries them from Harbor Freight to Mennard's.
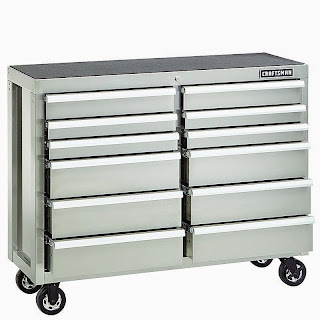 This was actually my favorite. One problem is that I wanted to add a counter top and they were already a little taller than I would have liked. Removing the casters was an option, but that took away some of the charm. OK, maybe charm is a bit of a reach for this item. How about quirkiness?
 FYI: The color selection is a little unusual for a kitchen. There is this one and they also come in cobalt blue. Then there is bright red and caution yellow. After some serious deliberation, I nixed this idea.
 I also considered using a piece of furniture as an island. The drawers on this one would not have held up to daily use and there was no easy way to fix that.
 I considered using this piece just for the drawers and taking the legs off to put a shelf below. But my brother convinced me there was an easier way to get what I wanted.
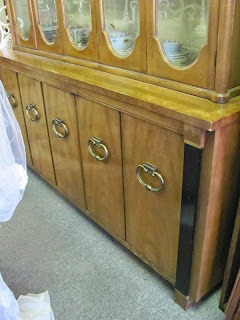 I also thought about just using the bottom of this piece,
 I would have gained some great storage.
 It was a super good price at the Miriam Trading Post but it measured 72 inches long and 68" is really my max for this kitchen.
I finally came around to just finding some parts and having my brother assemble them to make an island. I decided I would go for the industrial look so I searched the salvage yards and even some businesses I thought might have something I could use.


 I thought I might find some metal with great patina and I did. It just wasn't easy to modify for my purposes.


 Then, quite unexpectedly, I came upon pallets and pallets of soapstone at ReFab. This is a not-for-profit recycle yard. All the soapstone was scrap and most of the pieces were end cuts. It took four visits for me to find a piece big enough for my island that did not have a sink cutout or faucet holes drilled through it. Actually it was a bit of a miracle they even had a piece that big, and a bigger miracle that I was able to find it. There were several layers piled on top of it. Rose, a gal that works there, graciously moved the heavy pieces piled on top of the one I wanted. I moved the small scraps and for a few it took both of us. We had measured length and width from the sides of the pile and now we were holding our breath in hopes that there would be no cut outs or huge scratches on it.
 If we had had any energy left we both would have jumped for joy. This slab was in near perfect condition. Two of the corners are messed up but it is a couple inches wider than I need it to be, so those can be cut away. (the cutting part we haven't quite figured out yet. From what I understand it ain't gonna be easy.) If you are still counting, this makes part #3.
The next part had to be something I could use for a shelf near the floor. I was thinking metal but then as I started to gather the parts, I decided maybe wood would be nice. I drove up and down the alleys looking for scrap piles in the people's backyards. I thought if I saw something I would just knock on the door and see if they wanted to part with it. (I have done this before so I have experience. They look at you like you are a little crazy but they give their permission.) I also went through my older brother's stash and bugged my neighbors and friends.
 Yesterday I came home to find this piece propped up on my deck. It's about 6" short but I can figure out a way to make it work. My neighbor, Rich, alley shops too so he's a good source. Part 4 is now in the lineup.
 My idea is to use this bed frame along the sides of the shelf so the wood drops down onto one section of the frame and the other section covers the side of the shelf. I bought these at a yard sale a few years ago and then put them on my sale when I decided not to use them after all. Obviously, they did not sell which worked out well for me. Now they will be part #5.
I am planning to have three drawers directly under the counter top and Dan is going to construct those. Obviously we have to consider how this is all going to be held together but that's enough for this post. Can you picture it yet? Getting from point A to point B is never a straight line in this kind of work.


I finally came around to just finding some parts and having my brother assemble them to make an island. I decided I would go for the industrial look so I searched the salvage yards and even some businesses I thought might have something I could use.


Something like this would be cool somewhere bigger than my space.
I also considered making the island with pipes and fittings.
I checked that idea out by searching google images and Pinterest.

This was one of the cuter ones, but I continued to explore my options.

I checked out Shapiro for inspiration.


Filed these for future reference.

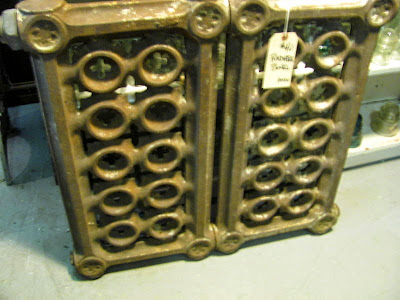
One day I came across these radiator panels at Quintessential Antiques. They were connected and are fairly heavy. I was pretty sure Dan would figure a way to pull them apart so I bought them. This was part #1 of the island.

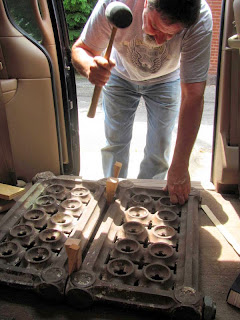
While they were still in my van, Ron pried them apart.
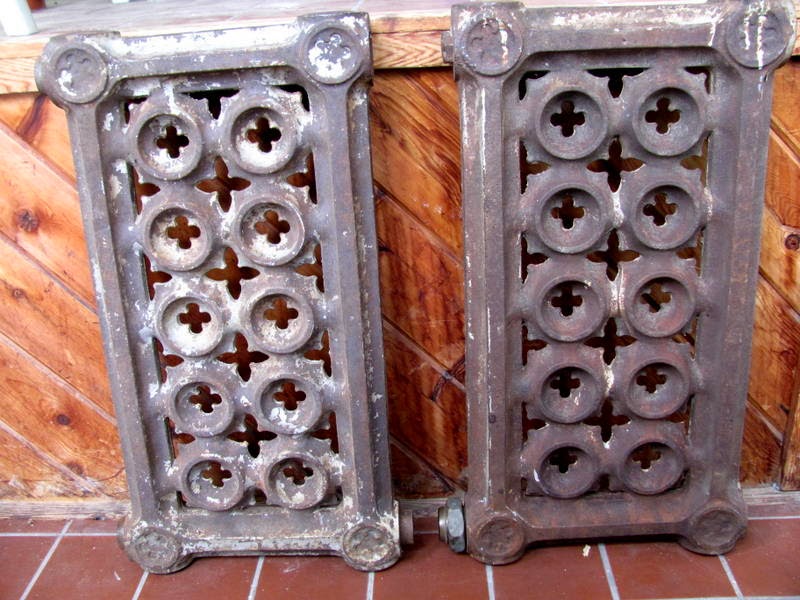
You can get a better look at the design here. These will be the end panels for the island.
Because I wanted these pieces up off the floor, I needed some feet on the corners. Dan, Ron and I brainstormed and come up with some very interesting ideas but in the end this is what won out.

Iron castors from Junque down at the Lemp Brewery. They really are perfect. I'm delighted with parts 1 & 2.
All along I had planned for a solid surface counter top for the island that looked a bit like concrete. Actually that is the name given to it by Caesarstone. The one on the right is named Sleek Concrete.

But after pricing the other counter tops, I decided maybe a laminate top might be fine for the island.


The next part had to be something I could use for a shelf near the floor. I was thinking metal but then as I started to gather the parts, I decided maybe wood would be nice. I drove up and down the alleys looking for scrap piles in the people's backyards. I thought if I saw something I would just knock on the door and see if they wanted to part with it. (I have done this before so I have experience. They look at you like you are a little crazy but they give their permission.) I also went through my older brother's stash and bugged my neighbors and friends.


I am planning to have three drawers directly under the counter top and Dan is going to construct those. Obviously we have to consider how this is all going to be held together but that's enough for this post. Can you picture it yet? Getting from point A to point B is never a straight line in this kind of work.
Comments
Post a Comment