The Reality of Rehab


Over two months has passed since the last post in which I promised this post would be showing you the pretty stuff.  Sadly, I can't deliver on that promise. The rehab clock sometimes runs counter clockwise.  Here us what I can show you.

The massive hood has been installed in the kitchen and the ceiling grid is in place.

Tile has been laid in the kitchen and...

in the front service area.


The floors behind the bar and the kitchenette on the second floor have been waterproofed and...


the tile has been installed.


The tile work that was started in the bathrooms had to be put on hold because of some plumbing problems.  Those "little" problems persisted resulting in the removal of parts of the drywall to resolve the problem.  But the ol' rehab clock is running again, although, not always keeping perfect time.


The second floor ceiling in this shot is ready and waiting for ceiling panels.

.Getting started on those panels.

This is a large area to cover and it took several days to get all these panels up to create a sound absorbing ceiling.

Almost finished and ready for paint.

But before the paint there was a lot of smoothing of walls.


And hours and hours of patching and sanding.


There were also many feet of that dratted HVAC tubing to snake around the room.


There were a series of scheduling conflicts with painters, but a bit of the painting has been done.
The ceiling color is a Benjamin Moore color called Barnwood.  The bricks on the back wall have one coat of BM called Museum Piece.

Sections of the second floor will be a Sherwin Williams color called Grandiose.  (although it looks yellow it is really green) And that, folks, is where we stand now.

Plans are being made for the front of the building but I'll save that for another post.


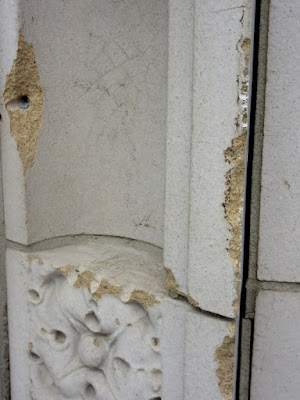
The glazed terra cotta tile work requires someone specifically qualified to restore this type of decorative finish.


 Most of the repair work is on the ground level, but all of it is in need of tuck pointing.


 This is a historic feature and I'm looking forward to bringing it back to it's original state so expect a full report at a later date.

I feel I have to end this post on a pretty note and this is all I've got for right now.

If you look at the brick section to the right of the window you will see strip with some wood cross bars going from the floor to the ceiling.  These are actually recessed spaces in the brick that allows room to run pipes and wires without having them exposed.  There are four of these channels on the second floor.

The plan is to wrap a 12 inch wide board with this fabric (Hunter's Purse in Mica) and attach it to the wall and cover the opening.  We cannot do that until the flooring (sample behind the fabric) is installed, so the results of this will have to be shown at a later date.

Wish I had more for ya', but that's all 'till next time.


Comments

Post a Comment

Popular posts from this blog

On The Upswing

After the last post, it seemed a good idea to do a follow up post to report that things are moving along nicely. This shot was taken before the remodel started.  The door at the end of the hallway leads into the bath now being remodeled. This is where the changes started.  The trim is off the doorway and the door opening will be enlarged to the width of the hallway. This shot taken of that same area now looks like this.  By closing the entrance from the hallway, that bathroom will now be the master bath by keeping the entrance from the bedroom only. This is how it looks from the bathroom side.  the door on the left leads to the hallway and the one on the right into the bedroom. Now it looks like this.  Part of the hallway has become part of the bathroom.  This is where the vanity will be installed.  The partial doorway you see on the right leads to the bedroom. Turning 180 degrees and looking across the room to the opposite corner, you see the window and the en

Out of No Where

Isn't it uncanny how a project can sneak into an already crowded schedule? Recently a friend invited me to do a walk through on a two-family he was planning to buy.  A couple pieces of furniture had been left behind and they were dumpster material to him.  Did I go with him thinking there was something there for me?   NO. Was I looking for something in particular? NO.  Did the thought of finding a new project ever cross my mind? NO!  But, see for yourself.  Could you have passed this up?  It was sturdy (translates to a little heavy). There was nothing wrong with it.  It even had all the shelves and the pins that hold them in place.  And without the shelves it was not quite as heavy.  (Try telling me that as my friend and I are hauling it down a flight of stairs.)  More shelving on the side made it even more practical.  I'm sure they could be used for something besides VHS tapes. Here it is in my studio where I could do a complete assessment.  Looks like a good cleaning

Small Storage Containers RECYCLED

 With the way grocery products have skyrocketed this past year, it has somehow made the containers they come in seem more valuable. To be transparent, I have always saved glass jars from jam, pickles, and spaghetti sauce.=) You know, small, medium and large. I also saved yogurt cups, sour cream containers, etc. When I was painting furniture and mixing colors, the small containers came in handy. This past summer I got a good laugh when I found a stack of yogurt containers in the back of a cabinet in my studio...at least 60! Needless to say those made it into the trash. More recently I have collected a fair amount of plastic containers with lids that are similar to the food saving containers you buy for that purpose. These are fairly large, about 5x7 inches and approximately 3" deep. They are great for leftovers but also good for storing a multitude of other smallish items. The bottoms are see through which makes them perfect for organizing hobby/craft and workshop items. But once a