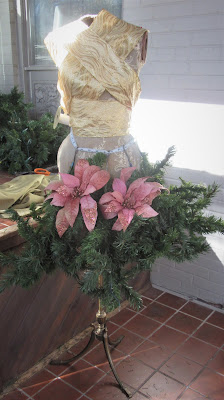
Normally when you hear "tree skirt" you think of something that covers the base of the Christmas tree and offers a nice background for the presents,
something like this. Another way to think of it is a project that has been on my back burner for a very long time. It's one of those Pinterest ideas that caught my attention and actually hung in there. Maybe because I have pinned a few pictures to a board dedicated to this very idea.
media-cache-ecO.pinimg.com
This is pretty glamorous, but the bodice on my form needs to be fully covered.
facebook.com
Love this one too and I might have been able to pull it off...but I didn't want to add the extra work of flocking the branches on my first try at this.
mannequinmadness.com
I'm a fan of bright colors but I ended up going for a more subdued look.
You can get more ideas from my Pinterest board labeled Dress Form.
I have posted about my dress form before and you can see that post here.
This is how she has looked for way too long. It was time to let the schoolmarm retire.
My plan was to use my old Christmas tree. However, when I pulled it out of the box, I realized the aging process had continued while it was boxed and it went straight to the dumpster. I thought this might be a good time to find one in the alley until it dawned on me that I had just put mine in the dumpster and digging in dumpsters in the hope of finding something better...well, probably not
productive. I checked St. Vincent de Paul, but theirs were still in working condition and priced accordingly. Next I put out a call for a throwaway on the Community Facebook Page. Almost immediately I was offered one just a couple blocks from my house. (Thanks, Linda)
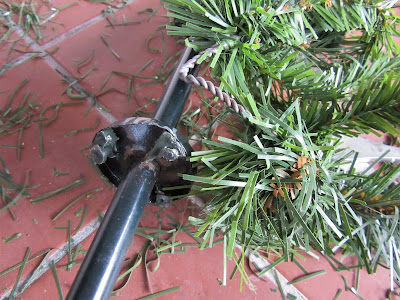
Removing the branches from the trunk/pole was a bit of a job. Two of the sections had branches held in by screws but the top had two branches connected by the twisted wire shown here. They were held in by a piece of metal that had to be pried up enough to release the twisted wire.
Next came the hardest part of the job...removing the lights. Even though they could be easily snipped with a scissors, they were wrapped, twisted, wrapped some more and then clipped twice to every little limb on each branch. I thought a lot about how thorough, meticulous, and serious some Chinese worker was about his job. Not once was there one clip instead of two!
Not so bad, you say? Consider this branch is only 15" long and has 12 lights with lots of wire between them. But, that's behind me now, and I will gratefully forget about it.
Here she is stripped down. So what's it gonna be? I like to make use of things I have on hand so I started there.
Using a tape measure to hold a few branches, I tried out some ideas.
It is already December so I don't have a ton of time to hit the resale shops and find something super cool. I'll save that for next year.
For this year, the skirt will have to be the focal point.
Now, time to attach the chicken wire. FYI: A tightly wrapped roll of wire tends to remain convinced it is meant to retain it's rolled shape, Pleading, threats, and cursing have very little effect on the wire.
Two people would have made this part easier but that was not an option if I wanted to move this project along.
Thank goodness I did have a wire cutter and it worked beautifully. Unfortunately I got a little overly enthusiastic and pinched the pad of my finger tip as I slammed them shut. That resulted in an instant blood blister and a sensitive fingertip for the next couple hours. (and probably a few more curse words)
Not the classiest job but it will all be covered.
Once the wire mesh was covered with greenery, I went back to the bodice. I remembered a short fur cape I had seen at a shop close by and decided to splurge thinking the effect might be worth it.
Wrong.
I so wish I had taken a picture before I returned the fur piece, but just imagine a little shriveled up 90 year old still wearing the fur piece she wore in the 40's. It was a lovely cape in a reddish brown that could have been great if it were made for this petite form.
I went back to trying a variety of decorative ornaments on the skirt and trying to decide just how many lights I should use. As I mentioned, there is a deadline, so I'm pretty much committed to things I have on hand.
It still needed something in the area of the shoulders, but so far nothing is quite working.
I also wanted to add a touch of sparkly to the skirt but that had not presented itself either.
Overnight I got the bright idea to try a scarf and found this one at the bottom of the drawer.
Then I went looking for something coppery with a sparkle. No luck at Hobby Lobby so I settled for some smaller ornaments in copper.
You know that feeling you get when things start to go downhill but you just can't put on the brakes? I won't even show you what happened when I added a necklace to this mess. I could feel the creativity draining out of me but I couldn't walk away from this.
There was a slight temptation to rip it all apart.
But, instead I started removing and stopped at this point.
I tried some computer effects on the photos....
...but that was not satisfying me either.
Because it was overcast and dreary, I decided to wait for a sunny day to decide what to do next.
One more trip to St. Vincent de Paul turned up absolutely nothing. And then the obvious broke through just as the sun brightened up the skies. (Maybe 10 hours sleep the night before cleared my brain.)
I took the few remaining pieces of greenery left from the disassembled Christmas tree and started arranging them over the shoulders of the dress form.
I had salvaged one string of working lights from the tree given to me by Linda, a neighbor who saw my request on Facebook.
Honestly this idea had flickered through my mind at the very beginning but I dismissed it as too predictable. I thought for sure I could come up with something more dramatic. Silly me! Sometimes the best idea is the first one that comes to mind.
This is a midday shot so I'll hold off for one taken at dusk before I post this.
At dusk.
I also wanted to add a touch of sparkly to the skirt but that had not presented itself either.
Overnight I got the bright idea to try a scarf and found this one at the bottom of the drawer.
Then I went looking for something coppery with a sparkle. No luck at Hobby Lobby so I settled for some smaller ornaments in copper.
You know that feeling you get when things start to go downhill but you just can't put on the brakes? I won't even show you what happened when I added a necklace to this mess. I could feel the creativity draining out of me but I couldn't walk away from this.
There was a slight temptation to rip it all apart.
But, instead I started removing and stopped at this point.
...but that was not satisfying me either.
Because it was overcast and dreary, I decided to wait for a sunny day to decide what to do next.
One more trip to St. Vincent de Paul turned up absolutely nothing. And then the obvious broke through just as the sun brightened up the skies. (Maybe 10 hours sleep the night before cleared my brain.)
I took the few remaining pieces of greenery left from the disassembled Christmas tree and started arranging them over the shoulders of the dress form.
I had salvaged one string of working lights from the tree given to me by Linda, a neighbor who saw my request on Facebook.
Honestly this idea had flickered through my mind at the very beginning but I dismissed it as too predictable. I thought for sure I could come up with something more dramatic. Silly me! Sometimes the best idea is the first one that comes to mind.
I published this post and then added one little thing so I just had to insert this picture. The pearl clip earring in the center of the corsage was the final detail. I knew something was needed there but I had to take time to look through my "stuff." And that's why I save things like one earring. It's very satisfying, not to mention redeeming, to find just the thing needed for a project in my "It could come in handy someday." stash.
This is a midday shot so I'll hold off for one taken at dusk before I post this.


It turned out very lovely!
ReplyDelete